Tuesday, July 3, 2012

INSPIRATION [4th of july party]

In honor of Independence day being right around the corner..ahem..TOMORROW! I've decided to throw together a few easy suggestions for your party that will make a huge splash! From bunting to the wine glasses, and the table runner, these are sure to be a patriotic hit!


INSPIRATION 4th of July Party

BUNTING: Recreate this look on a low low budget using bargain find ribbon and scrapbook paper! Cut into triangles, glue together for a great look at a non-existent price!

WINE GLASSES: This beautiful glass costs $22 a pop! Recreate using cheap glasses from the Dollar store, and rhinestone transfers found at your local craft store!

TABLE RUNNER: Fully functional, great for summer, and super cute! Simple stock up on bandanas in red, white and blue, and quickly sew together! No machine required!

Have some projects of your own, or used one of these? Let me know! Leave a comment, send me a picture, or a link to your blog!

ariana neala dear wallet


For information on the pieces pictured, click the image to head to Polyvore!

Sunday, July 1, 2012

DIY Project: Ring Display

Dear Wallet Ring Holder


I heard about the Dollar Tree $5 Challenge from another blog, and was so excited! Partly because I've been itching to craft lately, and have been so uninspired to do so. And partly because I always thought it would be cool to do a project entirely from one store (insert Project Runway addiction). I was so excited, that I ran out to my closest Dollar Tree immediately after reading the rules. Unfortunately I not only came up empty handed, but uninspired as well. Thankfully the boyfriend came up with an idea to check out The Other Dollar Tree the next day. A much larger, much better stocked, and much more inspiring store 30 minutes away. So I went home and scoped out the Dollar Store Crafts site and was shocked and amazed at all the goodies I saw on there. Determined to not only come up with something cute and easy, but functional as well: something that I could use every day I restarted my search the next day. That's when I saw the zen garden and inspiration (finally) struck! A ring display! My rings have found themselves all over my room and bathroom, in various 'trees', jewelry boxes, and plate displays. I needed something large enough to hold all of them, but easy to get them out, and see at the same time. A ring display would be perfect. My mind started going, and after a carrying around $20 worth of goodies, I narrowed it down to four. A set of (3) washcloths in super soft and pretty green microfiber, a plastic frame, a pack of pencils, and a ball of twine. $4. And I got to work. Joining me was a hot glue gun, scissors, and wire cutters (optional)-all on hand. [note that the zen garden didn't make it home with me..]


$5 challenge from the dollar tree


1. Remove the glass and mat from the frame. I chose a 5x7 because it was a decent enough size to fit a lot on, without being too huge for my dresser. I also chose a frame that had a thicker inset so the ring rolls wouldn't push out past it too far. The first step was to wind the string around the frame, there are many ways to do this, you can glue the front and wrap it messy, or pile it on at random, or layer it neatly as I did by simply holding it tight and wrapping it patiently and gluing occasionally in the back of the frame. I did the sides first, leaving the corners to last. When I got to them I simply wrapped the string left to right slowly covering the corner and creating a neat layering pattern (see pictures). My boyfriend liked it better with black showing through, so really you can wrap it however you prefer it!


Dear Wallet Ring Holder


Dear Wallet Ring Holder


2. Next I glued the back of the frame (the part that hangs/easel) to frame. This created a tray basically to glue my rolls onto. I glued the top and bottom first, and the sides after I finished. No real reason other than I forgot. After this I chopped the pencils in half using the wire cutters. You can use anything to cut them, you can even go hulk and break them in your hands. Doesn't have to be perfect, it just creates a stronger roll and gives you something to roll the fabric onto.


Dear Wallet Ring Holder


3. I took the first washcloth and folded it in half, this way it was just slightly longer/wider than the hole it was going to fit into in the frame. I placed a layer of glue onto the pencil, placed at the edge of the washcloth and started rolling. I only rolled about 1.5 times, gluing at the end. I cut the roll away from the rest of the washcloth, gluing the inner layer to ensure it stays in place. Not entirely necessary but makes it slightly easier to work with.


Dear Wallet Ring Holder


4. As you can see in the picture below, I basically folded the ends in to place in the frame, and rolled it into position at the edge of it so that the folds went under neath the roll. I glued as close to the bottom of the frame as I could to keep in place on both sides of the roll.Dear Wallet Ring Holder


5. Continue steps 3 and 4 until you get to the bottom of the frame. My rolls were about 1.5 cm each. I used 2 washcloths exactly, and 5 pencils to create 10 rolls total. Make sure you push them together when gluing so they tightly packed into place to hold your rings!


Dear Wallet Ring Holder


What I learned:
-You may not like the towel idea. I chose the washcloths because I loved the color and I swear these are the softest towels ever! Luckily Dollar Tree has a wide assortment of towels, clothes and blankets to choose from!
-5x7 was the perfect size! I can hold all of my rings, with plenty of room for more ;) and it looks great on my dresser!
-If I could do it over, I would cut off the edging on the towels. They didn't like being folded over and give it the messy-ish look in the pictures. Which I don't mind, it just took longer to deal with, and figured I'd mention to the blogsphere so they can get cleaner looking rolls in their own versions =)
-The pencils worked like a charm, the only non-preferable thing about them is they were slightly shorter than the width of the frame, which doesn't seem to affect how it holds the rings, but if you have something longer, or more pencils than I had on hand to cut the correct length I would try it!


Now, your turn! Can't wait to see your versions and suggestions! Have you made your own item for the $5 challenge? I'd love to see it, make sure you link it!
•project may be linked to a party, check the link tab to see which!•


ariana neala dear wallet

HOW TO wear the runway

Designers define the style, start the trends, and kick off the desires of every fashion loving girl (and boy) around. The problem is, the items on the runway are rarely wearable in the real world. But they give us inspiration, and tell us what to (and not to) wear. Interpreting the runway is a personal thing. Most blogs will tell you how to get the same look for less. The problem to me is, it's still not wearable. So not only do I reinterpret it differently, but many of the items you may have in your closet from a previous season. Add a trip to your local thrift store or Target, and you will be set for the season!


This season's must have color tone is 'seafoam' ranging in shades from mint green to soft blue, its easy to find and pair for any style. Here are some great runway examples from left to right: Vera Wang, Tibi, Rodarte, and Tory Burch.


HOW TO wear the runway


Here's how I interpret the runway:

A. Inspired from Vera Wang, This long sheer sea foam dress leaves you comfortable in the summer heat, classically beautiful for any occasion, and sophistcatedly sexy. Pair with the seasons must have accessory: gold, and you will be the talk of the town.


B. Inspired by Tory Burch, I've opted for a shorter bright blue dress with a loose fit for the summer breeze, and great for any body type and showing off a little leg. Layer your gold with necklaces, bracelets and beautiful gladiator heels for a natural beauty look, with bold statement for a lunch date, or a day of shopping.


C. Inspired from Rodarte, this beautiful bright mint dress, paired with a great contrasting blue belt and shrug when the sun goes down, perfect for a night on the town looking flirty.


D. Inspired by Tibi, this simple ensemble is great for running errands, or a day at the office. A tight fitting cardigan in mint green with pastel trousers, makes a great outfit for days when comfort is key. Keep your tones pastel and contrasting to add drama, steer clear of prints to give maximum affect, and make sure the leg is wide or flared to stay trendy!


Your turn. How do you wear the runway? Leave me a comment or send me a picture!

Click the image to head to Polyvore to find out more about the items shown!

Thursday, June 28, 2012

Guest Services: How to make matching jewelry sets

Welcome to the first of many guest posts on Dear Wallet, Cindy is thrift lover, second-hand picker, and jewelry designer from Sacramento, CA. She is currently in the process of starting her blog, so look for details coming soon on how to contact her! 
-Aria


So you found that perfect necklace to go with that perfect outfit, but alas, no earrings to match.  

Making your own jewelry can be the solution to this particular dilemma.  It’s fun, easy and cost effective.  Beads, findings (the metal parts that hold it all together) and tools can be found in specialty shops, online and at many big box stores like Joann’s, Beverly’s, Michaels’s and Wal-Mart.  The amber crystal beads that I chose for my earrings were purchased at my local specialty shop.  The total cost for the earrings including the crystals, findings and leverbacks came to under $5 .00. (A true win-win!) 

The first step is to select your components.  In this case I chose amber crystals in a medium size teardrops and tiny filler beads. To minimize frustration, play with different patterns and decide on an arrangement before you begin assembling. 
To complete this project I will need; 4 tiny crystals, 2 medium teardrops, 2 leverbacks, 2 headpins and 2 O rings.  
Next, thread the beads onto the headpin and using wire cutters, clip off the excess and curl the remaining wire into a loop. 
  
Some O rings are precut but these are not.  
This is easily remedied by making a small snip and slightly separating the ends just enough to slide the drop earring and leverback on.
 Twist back together and voile la!  You have a great pair of earrings.


Enjoy!
-Cindy

More jewelry design by Cindy:

All photos courtesy of Silver Daisies Studios.

Tuesday, June 26, 2012

INSPIRATION [color blocking]

Who doesn't love getting trendy styles without the trendy prices? Since I've been color blocking happy lately, I figured I would finish off the trend with an Inspiration post. My favorite part, is how custom this can be. Don't like the colors? Simply choose your favorites and have fun!


inspiration color block

SKIRT: Find a cheap thrift skirt in your favorite color, grab some fabric dye (follow instructions on box) and put in a tub large enough to dip your skirt into, hang to dry and you have a fabulous color block skirt in your favorite colors!
HEELS: I love these! Grab some cute shaped heels from your local thrift, scuffs don't matter because you simply paint with nail polish, add glitter while its drying, cover with clear polish or modpodge for a fabulous bling look!
PURSE: Find a simple purse that you love the shape of, use painters tape to tape off sections and create those great blocks, using fabric paint, change up the colors. When its dry pull off the tape to reveal your masterpiece!
NECKLACE: Find a cheap chain necklace, or head to your local home improvement store chain section. They have an amazing selection in every shape, size, and even material. Choose your favorite-but beware as fun and chunky as a metal chain would be-it may get heavy quickly around your neck so choose wisely! Finish off by dipping sections of the chain into your favorite paint cans, let drip dry, and add jewelry fasteners to make it easy to get on and off, or make it long enough to slip on!

To find out more about these designer items, click the image to head to Polyvore! My estimated prices for creating are based on savvy shopping at your local thrift stores, and what items most have around their house! Questions about how to do something? Let me know! I'd love to help, or even make a tutorial for something if requested!

ariana neala dear wallet


Sunday, June 24, 2012

Guest Services: Color Blocking

Welcome to the new and improved 'Guest Services'. Every month I feature a guest blogger, interview, or feature great projects from other fabulous DIYers! Want to be featured, or know someone who deserves it? Let me know!

Since color blocking is a popular trend this summer I've decided to kick off with a few great color blocking projects that are sure to spice up your life!

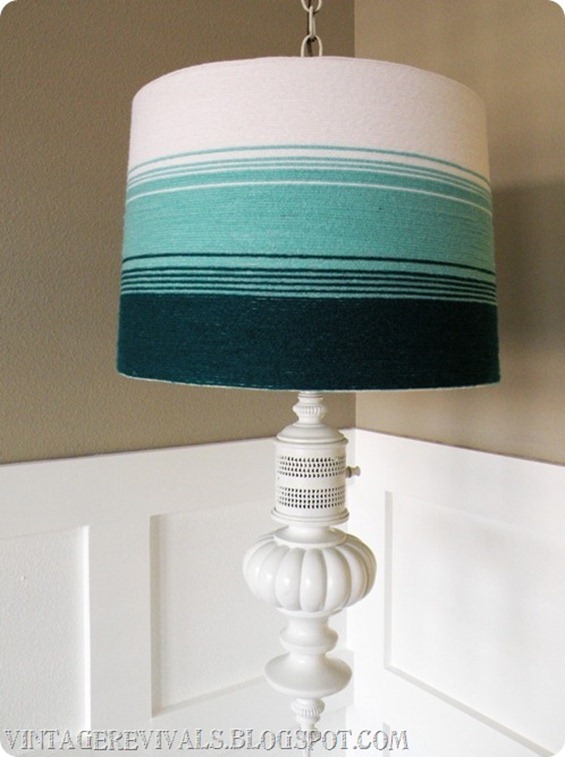
Yarn Lampshade Tutorial by Vintage Revivals

This beautiful ombre shade made using yarn and hot glue! Love it! Perfect way to bring character, color, and the color blocking trend into your home!

Color Block Bolster Pillow by Sew4Home

I love this pillow, and it has found its way onto my to-do list! A comfy and functional way to add the trend to your home! Choose colors you already incorporate into your room, and this pillow can tie the room together as the finishing piece!

Backyard Bird Bath by The Culinary Cougar

Your backyard needs love too!  How about this bright bird bath! Made from terra cotta pots, painted bold bright color-this is the perfect way to make a splash this season!

Color Block Clutch by PS I Made This

Such a simple project, so easy, so custom and so cute! Perfect addition to any wardrobe, especially if you're not completely in love with the trend! Add this to your daily ensemble and people will be lining up to compliment your style!

Make sure you not only check out these tutorials, but their sites as well! Some amazing projects you just can't miss out on-click on the name or image to be brought to their site!

ariana neala dear wallet

Friday, June 22, 2012

Summer Trends


This summer, its all about neon colors and bold prints. Pull your brightest tones out, for a bold color blocking wardrobe, pair with gold statement screaming jewelry and you will be the talk of the town! Need something a little subtler? Black and white are always a safe play-pair with a bright colored blazer, layer your accessories and you can't go wrong! Floral's are a strong contender this season in the trend circles, especially in dresses and pants!
Check out this beautiful gold statement find, a Betsey Johnson large dragonfly crystal necklace. Retails for $150, purchased for $20 on ebay!

I've said it before, I'm not much of a trend chaser, but I can't help it when I love something cute...and it just happens to be trendy! I've gushing over florals lately, so my trend wishlist this season starts with florals,  everything from jackets to tops, to dresses and shorts! Next on my wishlist is the colorblock, this girl loves color, so it just seems natural to pair a few bright shades together to make a bold statement. Last but not least is gold. Up until a few months ago I never would have looked at something gold, much less purchased it. But its been creeping up on me-and now its found its way onto my wishlist!

Summer Wishlist


Click the image to head to Polyvore, to find out who makes these fabulous items!

What trendy items are on YOUR wishlist this season?
Related Posts Plugin for WordPress, Blogger...