Showing posts with label organizer. Show all posts

Friday, August 10, 2012

Blog Planner Topic List | FREE Printable

I could be alone, but when it comes to writing a blog-I have no shortage of topics. In fact my only shortage is time! If I had the time I would easily post 1-2 a day, 7 days a week. Maybe someday, and I'm certainly trying to get caught up to posting 3-4 days a week, so if anyone has some extra time they could give me, donations are always welcome! ;)

Anyway, since I always seem to be jotting down ideas and sketching out potential topics, I needed a way to keep those organized. So I created this simple Topic List Organizer to not only allow me to keep my topic ideas organized, but begin the brainstorming for it as well! 
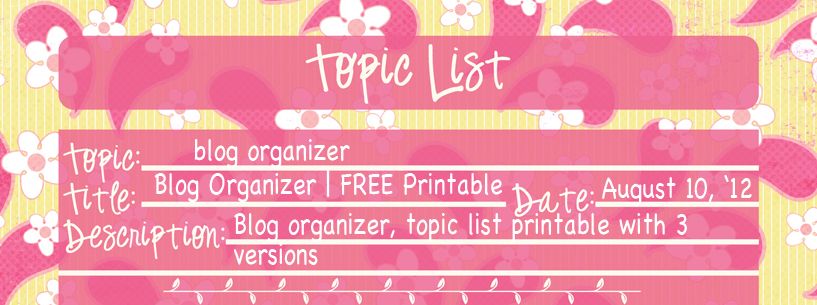
First off, I write down the general idea (the topic), usually its a couple keywords that will inspire me later to do the brainstorming for it. In this example I used Blog Organizer. Under that I label the potential post title, sometimes changing it to the final title once the post has been published so that I can keep track of it. I also write down potential publish dates, followed by changes to the final publish date because I keep these topic lists forever, to refer back to what I may have already covered and when. In the description section I brainstorm exactly what I envision the post including, for example printables, in 3 different versions.

Ready to get your blog organized? Click the image to download your favorite topic list! And leave a comment with your favorite version! If you haven't already, make sure you download a blog calendar planner!

 Rules for the download: please, please, PLEASE make sure you subscribe to the blog by GFC, RSS, or bloglovin and share on Facebook or Pinterest to send your friends-Dear Wallet Printables are for followers only! Do not reproduce, or claim as your own, all rights belong to Dear Wallet and Ariana Neala. Thanks so much, see you next time!

 Paisley Pink
 
 Green Daisy
 Gray Monotone
**Backgrounds are freebies from Design House Digital**
•This may be shared on any of the link parties page•
Photobucket

Monday, July 30, 2012

Blog Calendar Planner | FREE Printable!

I have a confession. I'm a note-aholic. I love writing notes. To do lists are my guilty pleasure. I could write To Do lists all day long (and sometimes do)! The best part is crossing something off my to do list. Oh yes, nothing screams productivity like crossing something off your to do list! But I suppose I digress, over the past few months I have downloaded some fabulous 'blog calendars' for organizing my blog. I can't emphasize how great they've been for organizing my thoughts. Except I've noticed that they always include things that don't relate to me, or more commonly, don't have things that I would prefer to have. I have no doubt that the creators of these made them to fit with their needs, which is perfect, but for what I need I always end up back to lined paper with messy notes! I've had a blog overall underway for awhile, I've been sketching out ideas, writing notes, and lots of to do lists. 

Finally debuting my first section! The Blog Calendars. This has been tested and tried (and tweaked) to work for MY blog. Will it work for yours? No idea! But I suggest you download a few calendars to try them out, and see which works best for you! Every blog is different, and if it isn't then I think you're doing something wrong. Worst comes to worst, none of them work perfectly for you and you will be forced to adapt it to your own blog! (Oh no! Just kidding, you should anyway of course!) I created a weekly and a monthly blog calendar, matching of course!

The Weekly Calendar features:
A breakdown of each day of the week including a spot for 'Title', 'Description', and 'To Do'
(yes I need my to do list for each day!) This way I can scribble down tentative titles, write detailed ideas for the post AND make sure I have a precise to do list for each post to ensure it gets done on time!

I also have a general 'To Do' list for the week, and brainstorming section for topic ideas (for later weeks) and make a list of goals for my blog! Since I'm a newbie on the scene I have small goals I set for each day X-minimum views per day, Y-views per week, Z-Comments etc etc. This keeps my goals in mind, and keeps me accountable for them (and hopefully ultimately works towards blog growth)!

The Monthly Calendar features:
A much more simple layout, simply put in the month, any notes for the time frame, and fill in the days with as much detail as you need or want. I like using this so I can see how full each week is throughout the month, and if I need to move a post to another week to keep things even.

I hope you find these as handy as I do. There are many more blog organization posts coming soon, this is simply the first of many! To make it even easier for you (or more difficult if you're indecisive) I created THREE versions of these for you! Choose your favorite and get organizing! Click the image to download! (These are high resolution 8x10 files!)

Rules for the download: please, please, PLEASE make sure you subscribe to the blog by GFC, RSS, or bloglovin and share on Facebook or Pinterest to send your friends-Dear Wallet Printables are for followers only! Do not reproduce, or claim as your own, all rights belong to Dear Wallet and Ariana Neala. Thanks so much, see you next time!

Pink Lemonade:

 Gray Monochrome:

Teal Birds:

**Backgrounds are freebies from Design House Digital**
•This may be shared on the link parties certain blogs require direct links: http://www.craftytexasgirls.com/ !•

Photobucket

Monday, July 23, 2012

Christmas In July FREE Gift List Planner Printable!

Hold on, don't click out yet!! I know what you're thinking- way too early, screw this!
And I agree…sort of.
Here's the thing, I'm on a budget. Tight budget. Pennies to nothing kind of budget. But I love to spoil the people in my life. Over the last couple years my Christmas budget has gone from $200 to $2 for each loved one in a very steep and fast decline. A couple years ago I decided to go all handmade, which ended up okay. The problem was I didn't get around to planning it until after October, and I didn't have any of the materials I needed so it ended up costing quite a lot to go handmade. This year I've decided to go handmade again, but this time I'm doing it right, and I'm inviting you to join me! The best part is, I'm doing this for handmade: you can put the same tips towards your holiday season, handmade or not and use it to save hundreds of dollars (as well as time and stress when it counts)! Now where to start. I know, its crazy to get your mind in a Christmas mood when its 100 degrees outside, but bare with me, if you do this now, you'll save yourself later-stick around for more helpful printables, card templates, DIY projects and stocking stuffers! You know what they say: make a list and check it twice!

The Christmas Gift List

Include anyone and everyone you could imagine putting on that list, include not only specifics (family and friends), but even go as far as co-workers and acquaintances. Why? Because a lot can happen in 6 months. Someone you may not know now; may end up your new best friend. Or unfortunately, opposite. A co-worker could become your new boss, or you get a new job! Put them all on now, and leave room for more later. I include extras like "10 coworkers" or "5 neighbors" and "3 white elephants" (under one category rather than individually) so I remember to grab extra goodies for those individuals-the people you may never talk to, but social etiquette demands gifts be exchanged. Before you get a paper and pencil out, hit print because this handy dandy printable created by yours truly will save the day in more ways than one. Choose from a festive red version, or more calming blue! Click the image to download!

Rules for the download: please, please, PLEASE make sure you subscribe to the blog by GFC, RSS, or bloglovin and share on Facebook or Pinterest to send your friends-Dear Wallet Printables are for followers only! Do not reproduce, or claim as your own, all rights belong to Dear Wallet and Ariana Neala. Thanks so much!


1. Use the list to record names of everyone on your list, print out as many versions as you need until you have everyone labeled! 
2. Below names you will see a sort of interview for each, fill it out as best as you can! 
Describe: try using 3-5 adjectives that describe that person: such as "loyal" or "adventurous"
Hobbies: List any and all hobbies you know about this person, include their career. If you're unsure, that's why starting early is great. Strike up a casual conversation and learn something! They'll never know, and plus this is great information to keep on hand for gifts all year round!
Ideas: List any ideas you may have off the top of your head, for example if you listed your 4 year old nephew as 'adventurous' maybe a play safari costume could be fun! If you don't know yet, that's fine! Leave it blank for now!
Here's an example I did for my friend Emma: (ok that's a lie. I have no friend named Emma, but I'm not going to post a real friend in case they come across this!)
3. Budget. For most of us that word is kind of depressing. But entirely necessary. Choose a realistic number for your gift giving. If your budget is $200, TOTAL-then you need to be realistic with your gift ideas. Put the number you're comfortable with at the top of the page where it says 'Total Gift Budget'. And most importantly: STICK TO IT. Now break it down, next to each name write in your max budget for that person. If your total is $200, and you have 10 people to shop for then you may not be able to go over $20 per person. But keep in mind that an acquaintance will have a different amount than your best friend versus your sister! Use pencil because there will definitely be lots of erasing in this process!

4. Now that you have your budget done, time for fun! Keep this list handy next to the computer or in your purse so you can add notes whenever inspiration strikes! If you see a great item at xzy.com -make a note of it under ideas! Make sure to write the location you found it at and the price so you can go back later! If your budget is smaller this is great for shopping around for the best price! If you come across the best idea ever, you can take the time to look for coupons and discounts that may happen between now and the holidays! Or it may give you time to figure out how to create something handmade similar!

5. Once you've found the perfect gift, and purchased or made it, you can record it under "gift" along with the "cost". This is handy for next year so you don't repeat a gift on accident, and the cost keeps you on budget! When you get near the holidays you can use the boxes on the top "wrapped" and "given" to keep straight whose gifts you have done, and at what step in the process they are!

Sounds easy right? Start now, thinking and brainstorming a little more each day, and save time, money and stress during the holidays! Just think: no more crowded lines, or terribly high priced items! Hit download and make sure you share on pinterest! And remember to hit subscribe because more great printables will be coming to help you keep the holiday season stress free!

                                    •This may be linked up to any of the link parties!•


Friday, October 7, 2011

DIY Project: Mail Organizer

Dear Wallet,

I lost the mail today. And then the car keys, and then my shoes. Oops.

Signed, Aria

First ever DIY project on Dear Wallet,! Not to be a killjoy, but it's not a brand new tutorial. In fact it comes from my OLD blog (Lillian Pearl Designs). You can check out the orignal post there, as well as a few others that may or may not eventually make their way over to this blog! I have a long list of to-do's, but wanted to start you out with something that's not only cheap and easy but super helpful as well!

mail organizer dearwallet, Insert the Mail Organizer. I know what you're thinking, a DIY project to organize the MALE in my life?!Oh you weren't thinking that? Oh the other thing...that those stacks of unopened mail that you have in every corner is not only cute (hello free decor..!) but also aids in the avoidance of bills (yay...more bills?)..ya..me too. I too have fallen victim to the adorableness that is junk mail, until I realized if I put it somewhere that created an eyesore I tended to do something about it. Like pay the bills and throw away said junk mail.*shockterrorblasphemy*  It sounds crazy, but it works! I tried a basket, which worked just fine. Until I needed the I needed the real estate for my growing vase collection. So I wanted something for the wall. I googled, and goodwilled, and shopped till my head hurt (is that possible?). But then one day I found a frame, and it all fell into place.


mail organizer frame dearwallet

Insert old ugly frame lacking glass. For some reason this gem was still sitting in my craft box waiting to bethrown away DIYed into a new life. Here's what you need:

Frame (mine was 11.5"x9.5"-but your's can be whatever works for you)
I needed sand paper, nails and wood glue because it was falling apart
Spray paint (I used white)
Screw hooks (I used four)
Cardboard/mat board
Spray mount
Fabric and scrapbook paper
Hot glue (or guerilla glue, or your favorite strong glue!)

Said frame was made of wood laminate and falling apart. So the first thing I did was sanded it lightly for prepping and used the nails and wood glue to put it back together. After which I reattached the hanging hook so it could hang in the correct format (horizontal). I placed the screw hooks by eyeballing it, however I suggest measuring. After this I took it outside for a coat or two of spray paint.

mail organizer dearwallet

While the frame was drying I started on the inside of the frame. First measure the opening of the frame and cut a piece of cardboard to fit. I used spray mount to place scrapbook paper on it, folding it over the back and gluing in place. (Like a present!)

mail organizer dearwallet

Then I cut two more pieces of cardboard half the size of the orignal, height wise. (Mine were 3.5"x9" each), then get your fabric out. Lay it out and spray mount the cardboard on one side, pressing it on the fabric. Then spray the other side and fold the fabric over so it fits tightly on the 'top' edge, and leaves about an inch overlap on the bottom, and side edges.

mail organizer dearwallet

When everything is dry you can begin assembling. First measure where you want your 'files' to go. I decided since mine were 3.5" high, to measure 3" from the bottom of the frame so the top file would hide slightly in the bottom file-I used a pencil to draw a line. Using the glue, I attached the 1" overlap of fabric to the board above the line (so that the board edge was touching the line, and the fabric was flat above it-see pictures)! The bottom piece will attach on the very  bottom of the bigger board in the same way.

mail organizer dearwallet

Once the pieces are assembled and dry, place it inside your frame. Carefully pull the files out of the frame through the front, until they are where you want them.  (Mine are no more than an inch away from the board, it creates a tight pocket with plenty of opening to place stuff). Cut the fabric down in the back (if needed) and glue into place. Close the frame up, and attach to the wall!

mail organizer dearwallet

You could easily add ribbons, buttons, and tabs to further customize this project! The project cost me NOTHING, because I had everything on hand! Now let me see your versions!

mail organizer dearwallet,
Related Posts Plugin for WordPress, Blogger...