Saturday, January 26, 2013

Using Overlays in Photoshop


Recently I released a set of Valentine's Day Overlays in my Etsy Shop, immediately I received a message asking 'How do I use overlays'?? I pointed her to YouTube to find some great tutorials on overlays showcasing just HOW simple they are to use. But it got me thinking I should create a simple tutorial to show how anyone with photoshop can customize them!  
*Disclaimer: when purchasing overlays check to make sure the seller allows customization of their product! Always respect the designers needs!*

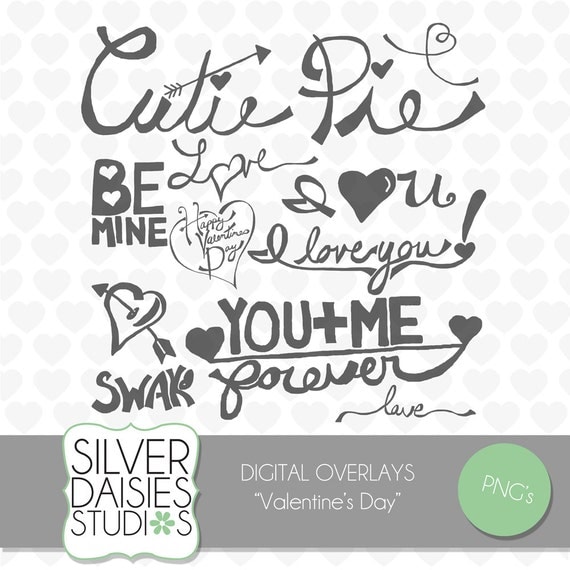
Overlays are perfect for decorating just about anything. They are scrapbook 'rub ons' for the digital world! Place them over your cards to instantly customize them, decorate your scrapbook pages and album designs and use them on your marketing templates! Now again, you can find a great tutorial anywhere on the web, but I want to show you how to personalize them using Photoshop [my screenshots are from CS4, if you have a different version of CS, your PS layout may look a little different]!
My overlay sets come as individual PNG files as well as a layered PSD file. PNG's can be opened in lots of different programs, and have a transparent backgrounds so you can place them over items without having a colored background to block what's behind it. The PSD is created in CS4, it should be compatible with any CS [Creative Suite] version, however the PNG is the most important file because it can be opened by most programs and customized! 
OPENING A PNG
You can open a PNG by simply going into Photoshop and clicking File->Open and clicking your chosen Overlay. This will bring up the file [mine are default black with transparent backgrounds]. If you would like to use the PNG on top of a template, card, album, or scrapbook page simply have your chosen aforementioned file open, click File->Place, and choose your favorite Overlay. This will place your PNG on top of your other layers. Once your file is open hit Layer->Smart Objects->Rasterize. This will convert the image into a vector file so you can edit it. [This is a basic tutorial, feel free to google 'rasterisation' to learn more of this process!]
SIZING THE OVERLAY
To change the size of your overlay, make sure the file is on a separate layer than the rest of your work. Select the layer, and click Edit->Transform and choose your transformation need [scale for size]. Now a box will pop up around your item, allowing you to play with the scale of it-there are 8 dots total in the corners and sides of the box. If you hover above a corner a two-sided curved arrow will appear- this allows you to move the item in a diagonal manner to place at a chosen angle.
Hover over the corner, and a two-sided arrow diagonal will appear, this allows you to directly resize the item. You can click and pull the corner to change, if you hold down the SHIFT button while resizing it will keep the ratio, while doing it without will let you play with the ratio. If you use a side dot to transform, it will not let you save the ratio! 
CHANGING COLOR
If black doesn't work for your project, you change that! The easiest way to do this, is make sure your layer is selected, and click Layer->Layer Style->Cover Overlay. Here you can choose a color and even play with the opacity of the item! Make sure you have 'preview' turned on so you can see the changes as you make them to get it exactly how you want it! Blending modes offer unique ways to blend the item and color, I urge you to experiment with it! The opacity effects how much of the item is see-through, which works nicely to let it work into your project without 'sticking out' too much! Play-Play-Play! You can alter the opacity by clicking on the layer in your layer pallet and playing with the opacity slider on the top of the pallet as well!
CHANGING DESIGN ASPECTS
Now that you have the perfect size, color, and opacity, you can start playing with other design aspects of it. One popular one is shadowing! If you double click the image in your layer pallet, a layer style box will pop up [you can access this by going to Layer->Layer Style->Blending Options as well]. Here you have choices for shadows, and even embossing! Click Drop Shadow on the right side of the box, [make sure you have preview on again], and play with the opacity, distance and spread to get the perfect shadow for your item! You can even customize it more by playing with the angle! Go through all of the layer style options to customize your item exactly how you like it!
OVERLAY AS A CLIPPING MASK SHAPE
Clipping masks deserve their own tutorial, but lets keep it basic! A clipping mask allows you to take a shape [for example a square box], place an image over it, and then fit the image within the box! Some overlays are thicker than others, which can make for fun clipping mask shapes! To use one Simply open a new document, your preferred size [or use within an existing project], and place the overlay on a layer [see above instructions]. Place your chosen image [or pattern, texture, digital paper etc] on a new layer ABOVE the overlay. Click Layer->Create Clipping Mask. This is automatically place the image/pattern/paper inside the overlay. If it doesn't fit correctly you can change the size of the image using the transform instructions previously mentioned!
Now have fun and PLAY! Overlays are great for the finishing touch to any project! My overlays are made for personal use, and commercial IF its a flattened file! Enjoy! If you have a project with one my overlays feel free to post or link to it in the comments! Can't wait to see how it worked for you! Have any questions? Let me know!
*I don't own and have never used Photoshop Elements, I'm not sure if this process is similar or the same*
This post may be linked up to any of the link parties on Monday HERE.


Sunday, January 13, 2013

Valentine's Day Printable Party Kit Giveaway WINNER!

If you hadn't realized, the Valentine Printable Party Kit Giveaway was Dear Wallets, FIRST EVER giveaway! Now as much as I love spoiling people and giving things away; I never wanted to make my blog center around giveaways and sponsored posts. It's distracting and boring, and in my opinion usually takes away from the blog. However, given that I was opening my shop, and [well...attempting] to not write posts this month, I thought that doing a giveaway was the perfect thing! And I'm glad I did, it was fun getting some new faces around here! But I'm sure you're all dying to know who won, so without further ado....[drumroll...]
Congratulations to Misty who is now a fan on Facebook of my design shop
Thank you all SO much for your support, for taking the time to leave a comment, share my shop and become a fan! Misty you should expect your file within 24 hours to the email you used to enter the giveaway!
If you were waiting to purchase the Party Kit until after the giveaway, now is your chance! Because at 12 EST the current sale is OVER! But you can snatch it up right now for just $14!
Valentine's Day Printable Party Kit

Thanks again to everyone for playing! When you purchase an item in the shop and use it; remember to send me pictures to receive something special! Make sure you check out the other party themes in the shop, and check back often because I add daily!
Photobucket

Monday, January 7, 2013

Pre-Grand-Opening of Silver Daisies Studios Design Shop +Giveaway!

Originally I intended to open my new Design Shop in February, but I had all these Valentine's Day goodies so I've been messing around with ways to sell them until the design shop opens. Turns out the easiest way is just to open the shop! So, the shop is open just for Valentine's Day items RIGHT NOW! As a pre-grand- opening sale I have a Valentine's Day Party Kit listed! Valued at $24, it's on sale right now for just $14!
 

Included is:
-Placecards Printable
-LOVE Banner Printable
-Cupcake Flags Printable
-Mini Cards Printable
-Tag Printable
-Party Invite+Envelope Printable
-Tic-Tac-Toe Game Printable
-Thank You Card+Envelope Printable 

+a BONUS item!  
*Note: Pictured is only part of what you are getting! Multiple versions are available of many of the items, and the bonus item is not pictured!*

This sale is going on until January 14th, when I take the kit down and will list the items individually. You can see some of the items on my Design Facebook Page Silver Daisies Studios.
Currently listed is also some cute Valentine Bunting Embellishments and Valentine Digital Paper and other fun goodies for Valentine's Day and other holidays!

GIVEAWAY!
That's right, I'm giving away ONE Valentine's Day Party Kit!
You can enter up to FOUR times, all you have to do is 'like' Dear Wallet AND Silver Daisies Studios on facebook, and leave up to two comments sharing how you follow Dear Wallet, blog, and if you pinned the Party Kit image above! Winner will be drawn on January 14th via rafflecopter. They will be posted on the blog + facebook!  
[You will only be notified on your blog if you leave a comment on here so I can find you, otherwise you will have to check back!]
a Rafflecopter giveaway
 
This promotion is in NO WAY sponsored, endorsed or administered by, or associated with Facebook, Pinterest or Twitter.
Photobucket

Thursday, January 3, 2013

Dear Wallets, Top Posts in 2012!

Hmm, three days into the new year declaring I wont be posting for a month, and yet this is my third post. Oops! ;)
I had actually meant to do this post in December, but with the busy holiday season + volunteering for a wonderful organization [Gold Country Wildlife Rescue if you want to check them out], I just didn't get the chance! So without further ado, Dear Wallets, top posts in 2012!

Top 3 DIY projects:
2. Mail Organizer
 [post is under construction right now]!
Top 3 Printables:

Top 3 Posts on Dear Wallet,:


What was YOUR favorite post in 2012? What posts would you like to see more or less of in 2013? Working on my schedule now, so I'd LOVE to hear your input!


Photobucket

Wednesday, January 2, 2013

Guest Blogging + FREE 8x10 Printable

When I first started Dear Wallet, I had huge dreams that included a guest blogger every week sharing amazing projects, ideas and posts with my followers. I put out a request, posted on my facebook pages, and even emailed big and small bloggers hoping someone would say 'sure'! But it never happened. Realistically my blog was just too small and unheard of, and still is. So I put the dream on the back burner and moved on. However in the last couple months I have received countless inquires about people wanting to guest blog on Dear Wallet. 

The interest is amazing, and I would be so honored to allow people to guest blog on Dear Wallet, however I need to make it clear - any guest post theme needs to reflect that of the Dear Wallet interests. I've been submitted some great articles, but of no relevance to DW, and realistically that wont help anyone - you, me, and most importantly - my readers.

So I would like to take the time to officially re-open the opportunity for guest bloggers, perfect timing as I plan my year of blogging now! If you would be interested in doing a guest post now, or even later in the year feel free to contact me with your idea, or just to discuss the possibility! But please take the time to read a few posts on Dear Wallet and familiarize yourself first with what my readers are used to seeing to ensure this is the best place for your guest blogging!
Email Me Now!

And just so you're not completely bored, check out this FREE 8x10 printable available only on facebook
LAUGH•LIVE•LEARN•LOVE•LISTEN
[Zip file containing two PDFs, one black background, and one white!]
Click the image to head to facebook, find the download link in the tab! While you're there, please take the time to hit 'like'! More facebook only things coming up!


Photobucket

Wednesday, December 12, 2012

10 Ways to Buy Thrifted Gifts

There is a lot of 'controversy' on shopping thrifted for gifts. Some people think it's taking the 'cheap way out', being lazy, or not being thoughtful enough. In fact it's the opposite. Shopping thrifted takes a lot more time, effort and thought than heading to your local big box store and buying the first thing on the shelf!  Here are ten ways to ensure you are getting the best bang for your buck, and the perfect gift for your loved one!

1. Shop Personal. If you're buying a thrifted gift, this is not the time to shop functional, 'traditional', safe gifts [IE: socks, games, shoes etc]. Spend time considering the person you're shopping for; what are their hobbies, favorite colors, things they collect etc.
Suggestions: Pig figurines for your aunt obsessed with farm animals, vintage photographs for the art connoisseur, unpublished hardcover manuscripts for the reading enthusiasts (I've found a few!)

2. Shop Quality. This is a huge thing to remember when thrifting no matter who you are shopping for. A deal isn't much of a deal if it falls apart the first time you use/wear it! Consider the materials, the brand, and the overall quality of the item. How embarrassing would it be if you purchased a gift that fell apart in the gift bag…and you couldn't return it!
Suggestions: Think Coach over Merona

3. Shop New. Ok it sounds like a contradiction, to shop 'new' at a thrift store. It doesn't have to be new with tags on it, but if you're buying a jacket, make sure it looks and feels new! Clothes shouldn't have a 'broken in' feel to them, items shouldn't have scratches or tears.
Suggestions: Purses that don't have stains, jewelry in flawless condition, books without torn pages.

4. Shop by the Person. Not everyone is 'ok' with thrift stores. Not everyone appreciates the savings, or wearing used clothes, or handling someone else's old stuff. Take that into consideration when shopping. My mom is my thrifting buddy, so I know she would appreciate a thrifted item more than my boyfriend who won't even go into the stores!

5. Shop clean. I would think this would be a no-brainer, but no matter how good the quality and condition is on the item you've purchased, take the time to clean it. Give it a great sparkle. This is when shopping less functional is better. It's one thing to buy yourself a sweater and drop it in the wash when you get home, but you shouldn't have to do that for a gift. Jewelry only requires a quick sanitary wipe, or a purse can have a quick cleaning inside. Even if it looks like it was never used, you should take the time to make sure its as clean as can be before gifting!
Suggestions: Make sure first you have only chosen items that look and feel new, then follow my handy cleaning guide to ensure they sparkle!

6. Shop Unique. This could go hand in hand for shopping personal, but shopping unique means don't buy something that's mass produced, or if you do at least make sure its vintage! If you can buy it at Target now, it's probably not worth saving a buck to buy it used at the thrift store.
Suggestions: Think of antique books, one of a kind paintings, and other vintage goodies!

7. Shop Re-purposed. Let's face it, a huge chunk of the awesome people who shop thrifted, also tend to be a little crafty. Take these skills or creative ideas into consideration when shopping! Maybe you can re-purpose a cool vase into an even cooler lamp, some old t-shirts into a great quilt, or an ugly knit blanket into a pretty scarf. If you can't figure out how to do something, it shouldn't be hard to find someone who can! Homemade gifts are wonderful ways to show people you care, and save money on your end. And you will always end up with a unique one of a kind gift!
Suggestions: mason jars filled with treats like hot chocolate and brownie mix for your neighbors (make sure you sterilize the jars first!), upcycled kitchen utensil artwork for the cook in your family,

8. Shop Repackaged. There's a small chance you're going to find the perfect item, in brand new condition in the original [perfect] packaging. For the items that lack the great packaging, take the time to do something original. This is not the time to throw it in a gift bag and call it good. Try something unique, a bread basket from the thrift store doubles as packaging and functionality. If you're not comfortable going double thrift on a gift, shop the sale sections for something different. A cheap cheese grater could double as packaging to hold the beautiful earrings you bought thrift.

9. Shop Smart. Create a budget before you go. This is somewhere between the basic thrift budget you should always be creating when you go, and your Christmas budget. Be realistic, have an amount you want to spend on a certain person and STICK TO IT. If you end up really below that number, don't feel bad! Holiday shopping is not about the price tag (please ignore what the retail stores are trying to tell you)! As long as you've shopped appropriately for that person, taking into consideration their personality and tastes, then the money you spent on that gift shouldn't matter. It will be the perfect gift whether you paid $5, or $50.
Suggestions: Use my handy little printable for coming up with ideas before you go shopping. Create your budget, keep the idea list in hand and you will find something perfect at your local thrift store.

10. Shop Realistic. Your best friend will love these leather gloves, but there is a tear in the thumb. Drop them. Your mom is going to die over this jacket, but the color isn't quite…normal. Move on. You brother collects carved wooden..things, but you think this is ugly. Keep shopping. Your reaction should be 100% the minute you see something. If you have to think on it for a minute, drop it and move on. Maybe after turning over the entire store you're still thinking about that great tarnished silver jewelry box, you can always head back to that section and see what your reaction is that time. Walking away is a great idea because you'll either forget about the item or feel a huge connection to it. If you put in your cart while you're shopping, by the end you'll feel a connection to it regardless of how much you like it and could end up buying the wrong gift.
Suggestions: When buying mass produced big box store gifts, you can always return the item if its not the right color. But when you buy thrift you don't have the luxury so be smart and realistic about the item before purchasing. If you don't love it for the recipient, then why would they? Make sure you check out my post on how to be a smarter thrifter as well!
 Photobucket

Monday, December 3, 2012

Holiday Gift Tags Printable

I had these note cards for sale in my shop for about 1 hour before changing my mind and deciding to share it for free with you guys! I changed them to small little gift tags- easy to print, put a hole punch through and string onto your holiday gifts!
  Rules for the download: please, please, PLEASE make sure you subscribe to the blog by GFC, RSS, or bloglovin and share on Facebook or Pinterest to send your friends-Dear Wallet Printables are for followers only! Do not reproduce, or claim as your own, all rights belong to Silver Daisies Studios and Ariana Neala. Thanks so much, click the image to begin download! 

•This may be shared on any of the link parties page•


Photobucket
Related Posts Plugin for WordPress, Blogger...