Showing posts with label necklace. Show all posts

Tuesday, July 24, 2012

INSPIRATION [patriotic accessories]


In this month of celebrating America, we can't forget about the goodies we're carrying around right? Don't worry, I've got you covered!

INSPIRATION patriotic accessories


TOTE BAG: This little gem serves not only as a great reminder of where you live, but extra functional to fit your workout gear, groceries, beach stuff, or serve as a purse! Simply take off the areas to create the stripes, and paint accordingly with fabric paint!

BUNTING NECKLACE: This beautiful necklace is great for any occasion, and any age! Grab a discount pack of scrapbook paper in patriotic prints or solids, fold and cut triangles along the fold (when unfolded they create long diamonds), place on your chain in the crease, glue together and you have yourself a super easy, and super cute accessory!

CLUTCH: Great for a night out, or your office wallet, take a simple clean lined clutch, lay flat and place a layer of modpodge on top of it, place your piece of fabric, and cover again with the modpodge, make sure you fold it a few times so it can settle into place before drying. Coat one more time, and hot glue a gold belt around it to keep it closed.

STAR SPANGLED BANGLES: Grab a few cheap bangles at your local thrift store, a couple bottles of nail polish, and cover with clear polish when finished! Great update to any wardrobe!

Have another idea, or tried one of these? Send me a link or picture! I'd love to feature it!

To find out information about the products used, please click the image to head to Polyvore!•May be linked up to any of the link parties•

Thursday, July 19, 2012

GUEST SERVICES ombre

I love featuring other bloggers, it shocks me when I stumble across a fabulous blog with brilliant ideas and only a handful of followers! I decided to jump on the 'ombre' theme this week. I admit- I can't get enough of this technique-better late than never!

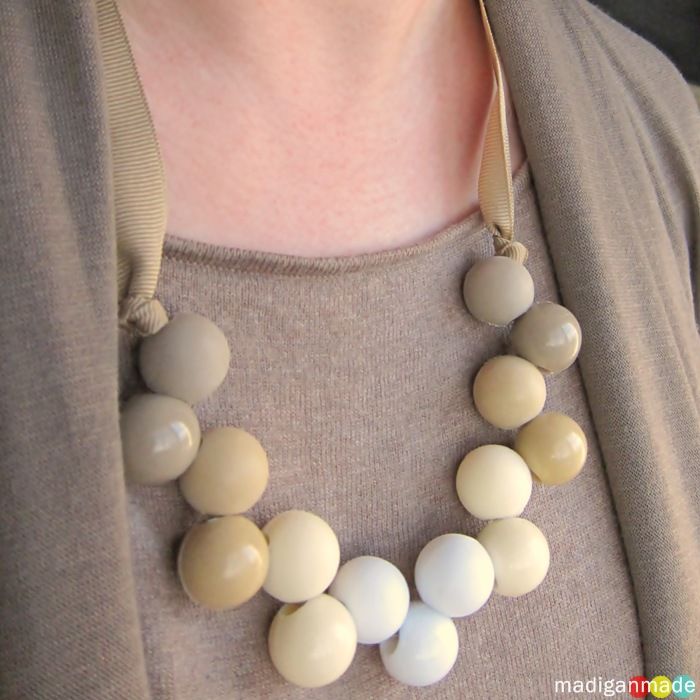
Dollar Store Necklace (made from pony tail holders!) by Madigan Made

Totally ingenious! Totally cute! Totally cheap and easy! (why aren't you making one RIGHT NOW?!)

DIY Ombre skirt by Harpers Bazaar

Talk about simple, I'm not a fan of the tie-dye look, so this is perfect- I get to play but get a look I love! I might need this in every color!

Ombre Painted Chevron Curtains from Owens Olivia (guest post on remodelaholic)

I've been eyeballing these curtains since their grand debut on Remodelaholic, I'm in love with them! This tutorial is perfect with great pictures too! (make sure you check out both sites)!

Ombre Necklace (Pistachio shells!) by Creme de la Craft

I can't get over how creative people are, and this is no exception! I'm not going to lie...I put pistachio's on my grocery list after I saw this!

Now get out there and start creating! Make sure you head to these great blogs and leave some love-and WHEN you Pin these projects, please do so from their blogs to give them full credit- tell them I sent you! If you've been featured, make sure to grab a button from the sidebar!
ariana neala dear wallet

Thursday, June 28, 2012

Guest Services: How to make matching jewelry sets

Welcome to the first of many guest posts on Dear Wallet, Cindy is thrift lover, second-hand picker, and jewelry designer from Sacramento, CA. She is currently in the process of starting her blog, so look for details coming soon on how to contact her! 
-Aria


So you found that perfect necklace to go with that perfect outfit, but alas, no earrings to match.  

Making your own jewelry can be the solution to this particular dilemma.  It’s fun, easy and cost effective.  Beads, findings (the metal parts that hold it all together) and tools can be found in specialty shops, online and at many big box stores like Joann’s, Beverly’s, Michaels’s and Wal-Mart.  The amber crystal beads that I chose for my earrings were purchased at my local specialty shop.  The total cost for the earrings including the crystals, findings and leverbacks came to under $5 .00. (A true win-win!) 

The first step is to select your components.  In this case I chose amber crystals in a medium size teardrops and tiny filler beads. To minimize frustration, play with different patterns and decide on an arrangement before you begin assembling. 
To complete this project I will need; 4 tiny crystals, 2 medium teardrops, 2 leverbacks, 2 headpins and 2 O rings.  
Next, thread the beads onto the headpin and using wire cutters, clip off the excess and curl the remaining wire into a loop. 
  
Some O rings are precut but these are not.  
This is easily remedied by making a small snip and slightly separating the ends just enough to slide the drop earring and leverback on.
 Twist back together and voile la!  You have a great pair of earrings.


Enjoy!
-Cindy

More jewelry design by Cindy:

All photos courtesy of Silver Daisies Studios.

Tuesday, June 26, 2012

INSPIRATION [color blocking]

Who doesn't love getting trendy styles without the trendy prices? Since I've been color blocking happy lately, I figured I would finish off the trend with an Inspiration post. My favorite part, is how custom this can be. Don't like the colors? Simply choose your favorites and have fun!


inspiration color block

SKIRT: Find a cheap thrift skirt in your favorite color, grab some fabric dye (follow instructions on box) and put in a tub large enough to dip your skirt into, hang to dry and you have a fabulous color block skirt in your favorite colors!
HEELS: I love these! Grab some cute shaped heels from your local thrift, scuffs don't matter because you simply paint with nail polish, add glitter while its drying, cover with clear polish or modpodge for a fabulous bling look!
PURSE: Find a simple purse that you love the shape of, use painters tape to tape off sections and create those great blocks, using fabric paint, change up the colors. When its dry pull off the tape to reveal your masterpiece!
NECKLACE: Find a cheap chain necklace, or head to your local home improvement store chain section. They have an amazing selection in every shape, size, and even material. Choose your favorite-but beware as fun and chunky as a metal chain would be-it may get heavy quickly around your neck so choose wisely! Finish off by dipping sections of the chain into your favorite paint cans, let drip dry, and add jewelry fasteners to make it easy to get on and off, or make it long enough to slip on!

To find out more about these designer items, click the image to head to Polyvore! My estimated prices for creating are based on savvy shopping at your local thrift stores, and what items most have around their house! Questions about how to do something? Let me know! I'd love to help, or even make a tutorial for something if requested!

ariana neala dear wallet


Related Posts Plugin for WordPress, Blogger...