Wednesday, December 12, 2012

10 Ways to Buy Thrifted Gifts

There is a lot of 'controversy' on shopping thrifted for gifts. Some people think it's taking the 'cheap way out', being lazy, or not being thoughtful enough. In fact it's the opposite. Shopping thrifted takes a lot more time, effort and thought than heading to your local big box store and buying the first thing on the shelf!  Here are ten ways to ensure you are getting the best bang for your buck, and the perfect gift for your loved one!

1. Shop Personal. If you're buying a thrifted gift, this is not the time to shop functional, 'traditional', safe gifts [IE: socks, games, shoes etc]. Spend time considering the person you're shopping for; what are their hobbies, favorite colors, things they collect etc.
Suggestions: Pig figurines for your aunt obsessed with farm animals, vintage photographs for the art connoisseur, unpublished hardcover manuscripts for the reading enthusiasts (I've found a few!)

2. Shop Quality. This is a huge thing to remember when thrifting no matter who you are shopping for. A deal isn't much of a deal if it falls apart the first time you use/wear it! Consider the materials, the brand, and the overall quality of the item. How embarrassing would it be if you purchased a gift that fell apart in the gift bag…and you couldn't return it!
Suggestions: Think Coach over Merona

3. Shop New. Ok it sounds like a contradiction, to shop 'new' at a thrift store. It doesn't have to be new with tags on it, but if you're buying a jacket, make sure it looks and feels new! Clothes shouldn't have a 'broken in' feel to them, items shouldn't have scratches or tears.
Suggestions: Purses that don't have stains, jewelry in flawless condition, books without torn pages.

4. Shop by the Person. Not everyone is 'ok' with thrift stores. Not everyone appreciates the savings, or wearing used clothes, or handling someone else's old stuff. Take that into consideration when shopping. My mom is my thrifting buddy, so I know she would appreciate a thrifted item more than my boyfriend who won't even go into the stores!

5. Shop clean. I would think this would be a no-brainer, but no matter how good the quality and condition is on the item you've purchased, take the time to clean it. Give it a great sparkle. This is when shopping less functional is better. It's one thing to buy yourself a sweater and drop it in the wash when you get home, but you shouldn't have to do that for a gift. Jewelry only requires a quick sanitary wipe, or a purse can have a quick cleaning inside. Even if it looks like it was never used, you should take the time to make sure its as clean as can be before gifting!
Suggestions: Make sure first you have only chosen items that look and feel new, then follow my handy cleaning guide to ensure they sparkle!

6. Shop Unique. This could go hand in hand for shopping personal, but shopping unique means don't buy something that's mass produced, or if you do at least make sure its vintage! If you can buy it at Target now, it's probably not worth saving a buck to buy it used at the thrift store.
Suggestions: Think of antique books, one of a kind paintings, and other vintage goodies!

7. Shop Re-purposed. Let's face it, a huge chunk of the awesome people who shop thrifted, also tend to be a little crafty. Take these skills or creative ideas into consideration when shopping! Maybe you can re-purpose a cool vase into an even cooler lamp, some old t-shirts into a great quilt, or an ugly knit blanket into a pretty scarf. If you can't figure out how to do something, it shouldn't be hard to find someone who can! Homemade gifts are wonderful ways to show people you care, and save money on your end. And you will always end up with a unique one of a kind gift!
Suggestions: mason jars filled with treats like hot chocolate and brownie mix for your neighbors (make sure you sterilize the jars first!), upcycled kitchen utensil artwork for the cook in your family,

8. Shop Repackaged. There's a small chance you're going to find the perfect item, in brand new condition in the original [perfect] packaging. For the items that lack the great packaging, take the time to do something original. This is not the time to throw it in a gift bag and call it good. Try something unique, a bread basket from the thrift store doubles as packaging and functionality. If you're not comfortable going double thrift on a gift, shop the sale sections for something different. A cheap cheese grater could double as packaging to hold the beautiful earrings you bought thrift.

9. Shop Smart. Create a budget before you go. This is somewhere between the basic thrift budget you should always be creating when you go, and your Christmas budget. Be realistic, have an amount you want to spend on a certain person and STICK TO IT. If you end up really below that number, don't feel bad! Holiday shopping is not about the price tag (please ignore what the retail stores are trying to tell you)! As long as you've shopped appropriately for that person, taking into consideration their personality and tastes, then the money you spent on that gift shouldn't matter. It will be the perfect gift whether you paid $5, or $50.
Suggestions: Use my handy little printable for coming up with ideas before you go shopping. Create your budget, keep the idea list in hand and you will find something perfect at your local thrift store.

10. Shop Realistic. Your best friend will love these leather gloves, but there is a tear in the thumb. Drop them. Your mom is going to die over this jacket, but the color isn't quite…normal. Move on. You brother collects carved wooden..things, but you think this is ugly. Keep shopping. Your reaction should be 100% the minute you see something. If you have to think on it for a minute, drop it and move on. Maybe after turning over the entire store you're still thinking about that great tarnished silver jewelry box, you can always head back to that section and see what your reaction is that time. Walking away is a great idea because you'll either forget about the item or feel a huge connection to it. If you put in your cart while you're shopping, by the end you'll feel a connection to it regardless of how much you like it and could end up buying the wrong gift.
Suggestions: When buying mass produced big box store gifts, you can always return the item if its not the right color. But when you buy thrift you don't have the luxury so be smart and realistic about the item before purchasing. If you don't love it for the recipient, then why would they? Make sure you check out my post on how to be a smarter thrifter as well!
 Photobucket

Monday, December 3, 2012

Holiday Gift Tags Printable

I had these note cards for sale in my shop for about 1 hour before changing my mind and deciding to share it for free with you guys! I changed them to small little gift tags- easy to print, put a hole punch through and string onto your holiday gifts!
  Rules for the download: please, please, PLEASE make sure you subscribe to the blog by GFC, RSS, or bloglovin and share on Facebook or Pinterest to send your friends-Dear Wallet Printables are for followers only! Do not reproduce, or claim as your own, all rights belong to Silver Daisies Studios and Ariana Neala. Thanks so much, click the image to begin download! 

•This may be shared on any of the link parties page•


Photobucket

Tuesday, November 27, 2012

INSPIRATION [gift giving guide]

Today's INSPIRATION is a little different than most, but since the holidays are in full effect, and time is running out for handmade holiday, I thought I'd give a little inspiration from now until December 25th! Every week I will feature three INSPIRATION projects just for gifts! Today features for HIM, HER, and the PET!
INSPIRATION gift giving guide pt1

FOR HIM: Men have a thing for globes, maybe it gives them a sense of wisdom and class that traveling provides. They give a masculine touch to any room, and look smart in any den or office! That's why this awesome chalkboard globe is so awesome! Not only does it look and feel masculine, but adds a great functionality and conversation starter. (I know, I know. A globe IS functional-but when's the last time YOU used one?? Google is faster!) Globes can often be found cheap in thrift stores, fix up an old one with a quick coat of paint from the craft store! Chalkboard paint comes in any color, apply with a brush or spray can [you can even make your own]! For extra oomph- you can add wood contact paper to the base to give it an extra elegance from the dollar store!

FOR HER: Looking for the perfect gift of bling and beauty for that special girl in your life? Combining washers (silver or gold!) with like-colored 'o' rings and finishing off with your favorite bracelet clasp creates a totally custom and cute bracelet! Simply grab your materials and play with the pattern until you find something you love! Then attach using the 'o' rings! For extra custom, spray paint the washers before you attach in a favorite color!

FOR PET: Toys are always a favorite for the pets in my home, and they can never have too many! Grab a cheap wool sweater from your local thriftstore, and cut out some cute designs from a piece of paper. (Dog bones are easy!). Wash the sweater in HOT water followed by the dryer so it shrinks a bit. Lay flat and cut out the shapes in the sweater. Make sure you cut out top and bottom layers so you have two pieces. Depending on the size of the toys, you could easily make 4+ toys out of one sweater! If you're handy with a sewing machine, flip the pieces so the outside is inside and stitch around the shape until you have about 1-2 inches left open, turn right side out and fill with cotton OR with left over pieces from the sweater! Stitch the rest by hand and whola-a cheap toy for your pet (that they will lovingly destroy in your honor)!

One thing I need to make sure gets through everyone's head: the holidays are not about the gifts. I LOVE spending time figuring out the perfect gift for someone I love. Watching them open it and seeing their eyes light up when they see something so personal and unexpected  (IE: NOT what they asked for on their wish list). But its the effort into giving that means something, not the gift itself. Budgets are incredibly important to remember this time of year, because what you spend on a gift for Christmas CAN affect what you will eat this week. Don't focus on the amount being spent, it's ok to make your per-person budget smaller than usual if it needs to be. It's ok to spend more time than money on a gift. Handmade has an amazing effect on people. Be financially responsible this holiday, and spend more time WITH your family, than LOOKING for gifts. =) 

And as always,  if you make one of these, send me a link or picture! I'd love to feature it!
To find out information about the products used, please click the image to head to Polyvore!
•This may be posted to any of the link parties

Photobucket

Wednesday, November 21, 2012

Liebster Blog Award!

Unfortunately I was nominated a month ago, but regardless I believe I should carry on the tradition and nominate some of my favorite, well-deserving blogs! The hard part is choosing! So many deserving hidden gems! First off, a huge thank you to Helen from Blue Eyed Beauty Blog who lovingly nominated me! See the original post here
  Facts of the Liebster Award:

The Liebster Award's origins are pretty much a mystery. Bloggers nominate other bloggers that have 200 or less followers. It's basically a "Hey, that's a sweet little blog you've got there. Here's an award!" You can't just accept the award. You have to play by the (ever changing) rules and pay it forward. Then you can put the award on your blog for all to see.

The Rules:

1. List 11 facts about yourself.
2. Answer the 11 questions given to you.
3. Create 11 new questions for the bloggers you nominate for the award.
4. Choose 11 bloggers with 200 or less followers to nominate.
5. Go to each bloggers page and let them know about the award.
6. Thank the person who nominated you and link back to their blog. 

11 Facts:
1. I'm a portrait photographer turned conceptual fine art photographer.
2. My favorite color is pink, always has been, always will be. BUT I tell people its green because people tend to bombard me with all things green until I get sick of it, and I don't want that to happen with pink. ;)
3. I'm mom to a chihuahua, he's my fur child, my baby, and my best friend. His name is Reeses! <3
 4. I'm extremely shy, quiet, and reserved. Unless I'm shooting a camera.
5. I bite my nails. Badly. Every day of my life. And I can't stop.
6. I love writing, and have dreamt of publishing a book since I was 4. But I'm a horrible writer, so blogging is my compromise!
7. I drink way too much coffee, but I love the taste and warmth so much I could never stop! 
8. I tell everyone I'm a vegetarian, but I'm not. I eat chicken and shrimp which in most people's mind IS a vegetarian (its not). I haven't eaten any other meat (on purpose) in almost 20 years. Ahem, I'm 24.
9. I dream of making a difference, I haven't figure out where or how yet. But I will. "Self Sustaining" is my start. Someday I hope to start a charity.
10. I have a love/hate relationship with DIY. A sociopolitical reason. Stayed tuned for a post on that.
11. I have more jeans than shoes. And I have a LOT of shoes. ;)

Here are the 11 questions from Helen:

1. Where were you born? Northern California
2. What is your favorite hobby?
My hobby is photography, it also happens to be my job! :)
3. If you could only have five pieces of clothing in your closet what would they be (not including pajamas or undergarments)?
Paris Blues Jeans, Delia's jeans, red high heels, bebe trench coat, and red lace halter!
4. Are you happy living where you do right now?
I'd like to find my own place in the world.
5. What is your favorite thing about blogging?
Getting the chance to share the ideas in my head with the world! =)
6. Have you ever gotten an award before--not just in the blogging world!-?
A few for poetry and photography, marketing events and graphic design.
7. Would you rather go for a walk or a run?
Run.
8. How many kids do you want to have?
Not really sure, I'll get to that when I get to it. ;)
9. What are your favorite junk foods (3-5)?
Probably ice cream and chips, and fries.
10. What is one odd habit you have?
If I touch something with my left hand, I have to touch it with my right (or vice versa) or the other hand will start tingling. Yup. Odd.
11. What was your first car?
Civic, still got it. <3 it. Only considering trading it in for a bigger honda.

MY 11 Questions:
1. Where do you live?
2. Favorite recipe?
3. Favorite author?
4. Most common thing you google search?
5. Favorite animals (wild or domestic)?
6. What is your favorite thing to blog about?
7. Favorite Disney character (cartoon or live action)?
8. When did you start blogging?
9. If you could tell your childhood self one thing, what would it be?
10. When is the last time you went a date, what did you do?
11.  What would you do if money was no object, and you could NOT fail?

MY 11 Nominees:

Make sure you check out these blogs! They deserve some love, and have wonderful posts! I will update the links as they play along with the Liebster Blog Award! Thank you again Helen!

Photobucket

Tuesday, November 20, 2012

INSPIRATION [turquoise & gold]

I'm not going to lie, choosing the pieces for this INSPIRATION was difficult. I love the turquoise + gold combo right now, it's so beautiful and elegant yet totally casual and wearable! I decided on bangles as the theme since I seemed to be so obsessed with them!
INSPIRATION turquoise&gold

BANGLE 1 [red feature]:
First find yourself a cheap bangle you can't wait to redo! Choose your favorite style, any material will do [for this bangle, a flatter bangle will work better than a curved]! I'm showing the use of nailpolish only because its readily accessible in most girls collection, but plastic paints, spray paints, acrylic can even work! First paint the interior of the bracelet gold, once dry paint the outer black. Using painters tape, cut into long thin strips creating a grid pattern on the bangle. Tape along the edges, and through the middle, then going down, perpendicular. The easiest way to do this is to measure your rhinestones and bracelet circumference first and create the grid off that. Place the rhinestones in the squares left showing, take the tape off, and place smaller rhinestones in the corners. Rhinestones can be attached using super glue, hot glue, or if they are self adhesive!

BANGLE 2 [zebra stripes]:
As always, find a cheap bangle you can redo without missing! Choose any style or material that suits your fancy! Again, I'm showing nail polish, but acrylic, plastic paints, even spray paint will work! Choose what works best for the material bracelet you chose! Cover the whole thing with gold paint. Once dry cut out zebra-like stripes in painters tape. Attach on in your chosen pattern and paint the rest using your turquoise paint. Once dry, remove the tape and place rhinestones over the gold still showing. You can attach the rhinestones using super glue, hot glue, or if they are self adhesive!

BANGLE 3 [dots]:
[Rinse and repeat] "find yourself a cheap bangle you can't wait to redo! Choose your favorite style, any material will do!" I've shown using nail polish, but any type of paint will do (read above descriptions). First cover the whole bangle with gold paint, when dry begin attaching your favorite rhinestone or embellishment. Check your local scrapbook store! You can find sheets of glitter, stone, pearl, or rhinestone embellishments all self adhesive on sale! You can use a piece of painters tape to line up the first row to keep you straight, or just wing it at random! How fun, can't wait to see how yours turns out!

BANGLE 4 [tribal]:
[Read above descriptions for how to choose your bracelet and paints!] First cover the whole bangle with gold paint. Once dry cut your painters tape into square pieces. Cut those in half diagonally creating triangles. Attach the triangles across the top and bottom of the bangle so that the 'point' is pointing 'in'. You can go one step further by cutting thin strips of paint and attaching the outer edges of the triangles to create the sections shown. Then paint the outside of the bracelet turquoise. Once dry, remove the tape and see your masterpiece!

Did you make one of these? What color combo would you choose? Send me a link or picture! I'd love to feature it!
To find out information about the products used, please click the image to head to Polyvore!
•This may be posted to any of the link parties
Photobucket 

Monday, November 19, 2012

Dear Wallet Update PT2-Self Sustaining

Where do I start...I've been gone for almost exactly two months (and I've missed you all so much!)-the funny part is, when I stopped posting, I actually got MORE page views than when I was writing 3-5 posts a week! I've received tons of emails, comments, and messages from people concerned about my absence and I'm so honored! I'd love to say that I am 'back', but unfortunately I can't guarantee that. I can promise to try to post as often as I can though!

 I wanted to give a little sneak peak as to one of the many reasons I've been gone, I started a new project called 'Self Sustaining' and includes not only handmade props and styling, but self portraiture as well! This first piece is a concept shot for the cover of my coffee table book. I have not released any more teasers of the props or shoots I've completed yet though. To read more about this project head to my other (neglected) blog Ariana Neala!
A little information in case you don't feel like reading two blog posts:

Entitled- "Cereal'
"A series of masks and accessories were created for this shoot [one pictured], 3D triangles created using a total of 9 cereal boxes and archival glue. Roughly 3 hours for creation of the accessories. All materials were up-cycled from finished cereal boxes from multiple families."

I really urge you to read my little teaser and please, please, PLEASE pin and share and make it go viral! My hopes for the project extend much farther than a simple coffee table book and I need your help to get there! Thank you! =)

In other blog news, I have an INSPIRATION project for you tomorrow AND a (late) Liebster Award on Wednesday! Plus more sneak peaks of what I've been up to coming up after Thanksgiving!

Photobucket

Tuesday, September 18, 2012

Dear Wallet Update

I thought I may take a couple week break from the blog, thinking no one would notice-boy was I wrong! Thank you to all the emails, comments, and facebook messages from everyone wondering what happened! I feel so loved and appreciated, and I want you to know that Dear Wallet is not gone for good! I was struggling keeping up with posts, and thought I would take a quick break to catch my breath.
For one thing, I'm having wrist problems with my right [dominate] hand. Not only was hand writing posts [which I usually do] impossible, but typing them one handed has been [and IS, as I'm doing right now] too difficult to continue. 
I've also spent a lot of time working on a new venture. For the sake of keeping you guys interested I will post a sneak peak, but the details aren't going to be released quite yet. That's all for now, thank  you all to your continued support-I promise Dear Wallet will be back before you know it and better than ever! <3
Make sure you head to facebook and like my page, so you can stay up to date on all things Dear Wallet!
 
Photobucket

Friday, September 7, 2012

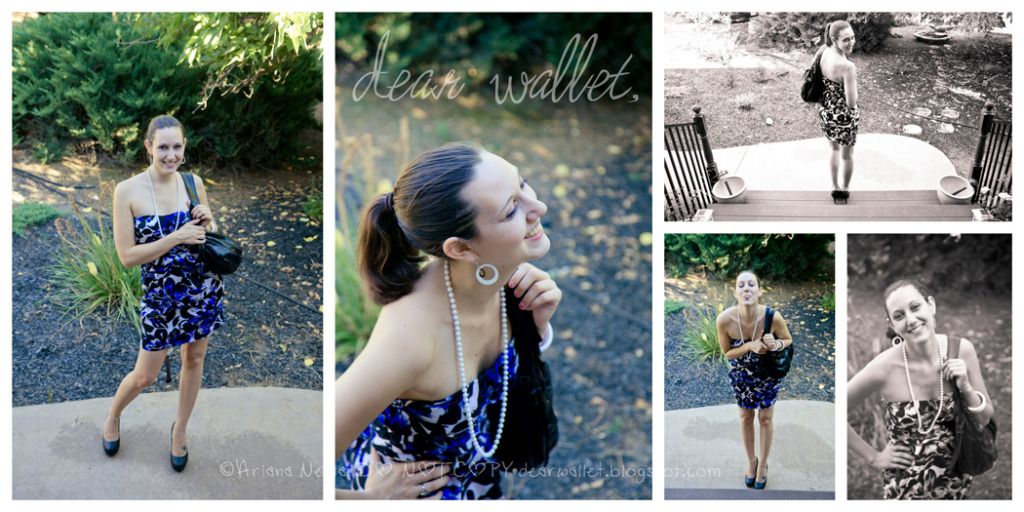
MY THRIFTED OUTFIT Bloomin Blues

You'd think I'd start getting better at this being in FRONT of the camera stuff, but I may be getting worse..oh well. These shots were taken by my assistant aka boyfriend aka Rob. Leave it to a boy, but there are more pictures of the back of this dress, than the front! ;) The only story I have behind this outfit is, I spent all Summer looking for a cute dress to wear! And of course I JUST found it, so the first chance I got I wore it shopping! Nothing like wearing a thrifted dress on a thrifting trip!
 
What I'm Wearing:
Dress: Snap originally $60- I paid $5 at Goodwill Auburn
Shoes: Miss Me originally $60-I paid $7 at Discovery Shop Auburn
Purse: Nine West originally $90-I paid $7 at Discovery Shop Auburn (although technically I didn't pay for it-it was a gift!)
Necklace: No name -I paid $.25 cents at Goodwill Roseville
Earrings: No name-I paid $1 at Discovery Shop Auburn
Bracelet: No name-I paid $.50 cents at Goodwill Roseville
Originally worth $210+, I paid $20.75 (or $13.75 minus the gift)!!!
I also showed off those cute shoes in My Thrifted Outfit garden edition, make sure you check out that outfit as well!

What do you guys think? Good investment? Hows my styling?

Photobucket

Tuesday, September 4, 2012

INSPIRATION vases

I love vases, what could possibly be an easier way of bringing warmth, comfort and happiness into a home than a couple of flowers? And of course how would you possibly display those flowers without a beautiful vase to go with it? But lets face it, sometimes they can get a little...expensive. So lets bring them down from hundreds of dollars...to a couple dollars.
INSPIRATION vase


 BLUE VASE ($180): First off find a fabulous vase you love. You can get them cheap at thrift stores, or even at the dollar stores! Find a shape you like or see potential in! Then spray paint! Choose your favorite color and go for it. Personally, I don't like the idea of paint being inside the vase, so I would turn it over and spray that way and let it dry. Then head to your local craft store and find some great appliques! They come in wood, foam and more! Find your favorite and stick on! You can even paint over them before you stick them on, or after using watered down paint on a cotton ball for a distressed look!

YELLOW VASE ($800): I love how funky and vibrant this is; to make your own find a funky vase shape you can't live without! Spray paint your favorite color (follow the instructions above), and use scrapbook rub ons to put the fun decals! Rub ons are super cheap, super easy and come in everything from shapes to pictures to quotes!

TURQUOISE VASE ($200): I wish I could find a cute vase like this around here! Thankfully my local dollar store has cute round vases that are screaming for this! Paint your base color first (in this color scheme that would be gold), let dry and then cut out the shapes you want in painters tape. Measure and place on the vase, once you have them in place (and pressed down tightly), spray paint again with your top color (turquoise). And Whola! Perfection and fun vases for a mere couple dollars! 

I can't wait to see what you guys are doing with your vases! Make sure to send me pictures if you try any INSPIRATION projects! You may just get yourself featured!
Photobucket

Monday, September 3, 2012

10 Ways to Create a Textured Backdrop without Wallpaper


 For many living in rentals, the rule for 'no wallpaper' is quite apparent. For others, they don't like the look of it. And for some, they have an aversion for it because it tends to date itself quickly, colors may fade if on a wall facing direct sunlight, it can get expensive-fast, and lets face it, it's not a 10 minute put up/take down project! But wallpaper creates color, texture, and pattern on a wall that may otherwise end up white and forgotten. So if you're wishing for that look, but minus the wallpaper-whats a girl (or guy!) to do? One word. Cluster.

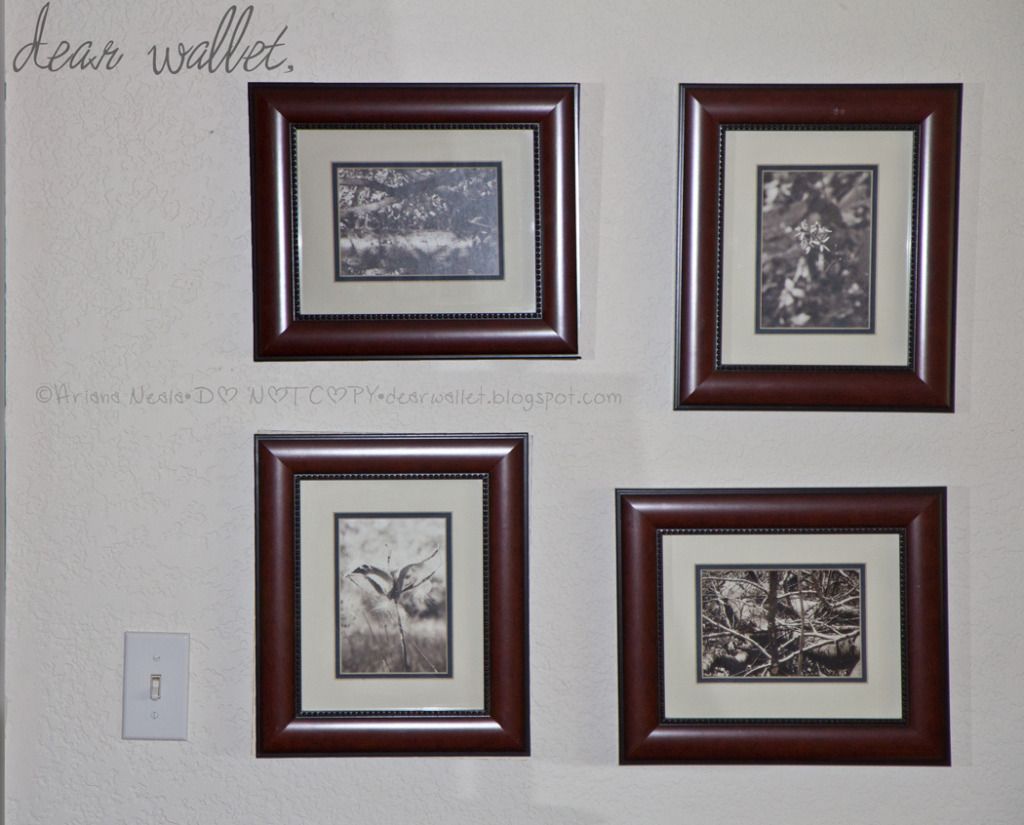
1. Wall Gallery: Hello .25 cent frames from your favorite thrift store! Grab any shape or size or color you like and color accordingly! Coordinate them by painting them all the same color, or leave them au-naturale for a funky eclectic look! Fill with anything! Wallpaper, paint chips, kids paintings, family pictures, maps, postcards, handkerchiefs, fabric, scrapbook paper-oh my, the possibilities are endless!
Small cluster hanging in a very small area in the hallway. (Photographs by my mother, not me!)
2. Clustered Artwork: scout out your local thrift stores, school art fairs (support a student artist!), and garage sales for artwork that catches your eye. Collect in themes; by color, style, medium, subject, or go crazy and grab anything that creates emotion! Cluster along the wall, place an item anywhere it will fit and you will never miss color or texture in that room again!

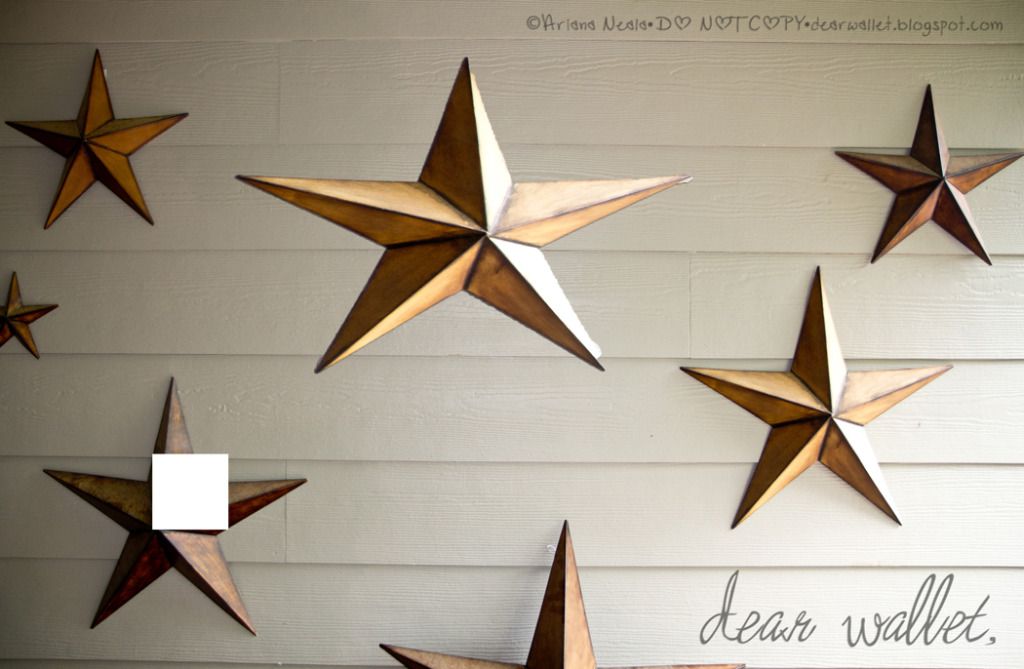
3. Dishes: Mismatched (or matching!) plates are sure to give a elegant and colorful pop to any room. Treat them in clusters, or create shapes to make it fun! Add in silverware for an unexpected pop of shine and texture! Don't like dishes? Find a favorite object, collect and hang!
Star cluster hanging in the entry way outside.
4. Bunting: These adorable little flag garlands have a fantastic way of bringing out personality in a room. Whether you're look is more rustic with burlap, girly with floral fabric, natural with wood cutouts, patriotic with country flags, or 'green' with recycled items; bunting is the perfect way to add texture and color to your room without overloading. Plus they are small and light making them easy to tape on the wall if you can't nail, and even easier to change out with the season! Try layering them for extra depth!

5. Canvas: Canvases are the ideal wall hangings, they are light and easy to hang or move, and they come built in with texture! Add a splash of color with paint (and paint over that when you get bored), find some cheap artwork to hang from the store, cover with fabric, or collage paper on it! The 3D nature of canvases turn any simple project into a professional looking one! Hang your canvas as one super large one, or in a clutter to fill up the wall!

6. Mirrors: Mirrors make rooms larger, which is perfect for a small cramped apartment! Collect your favorites from thrift stores in varying colors and sizes and shapes and create a beautiful cluster on the wall. The shapes will create movement and texture, the color will add pops where you need it in the room, and the mirrors will make the room bigger. Did I mention beautiful?

7. Tapestries/Quilts: Quilts and tapestries are simply textile artwork. So much time, energy, effort and love goes into these pieces and they do not deserve to sit unused. However I understand the safety concern with using thrifted quilts, but try them on the wall instead! (After its been cleaned!) They act as a gorgeous original piece of artwork, full of texture, color and whimsy! There is a quilt design for anyone out there, no matter how country, traditional, or contemporary you are!

8. Light: I know, I know, lights is totally original right? Well then create an unusual spin on them! Use rope lights to spell out your favorite words (LOVE or FAITH anyone?), place christmas lights behind canvases to get beautiful atmospheric light-go a step farther and cut holes into the canvas and stick the lights through them (remember lightbright?)!

9. Chalkboard: Chalkboard has to be my favorite texture of anything. If people would let me, I would probably paint everything with chalkboard paint. Furniture, walls, lamps. Yup. Try it for yourself! Paint an entire wall with chalkboard paint, then you can change out the 'word' (LOVE/FAITH etc) every season, or when you get bored! Want something less bold? Paint a canvas or frame!

10. Flowers: Flowers are the perfect way to brighten up any room, whether they are real or fake they have color and texture like nothing else! Try them in bouquets, by putting vases on the walls, or attaching to frames! Or create beautiful garlands that stretch across the room. Create clusters inside of frames and change out with the season or when you change the color scheme!

You inspired yet? Make sure you follow me on Pinterest to keep up with other great ideas!
Which of these ideas have you done, or are you going to try next? What other ideas do you have for creating color, texture and depth in a room without wallpaper?
Photobucket

Wednesday, August 29, 2012

6 Benefits of choosing your favorite thrift stores


If choosing your favorite thrift store seems useless to you - read on! Here are my top 6 reasons for choosing your favorite store:
1. If you shop somewhere often, stay awhile, and usually spend money (doesn't have to be a lot), the owners will start to recognize you. When they recognize you they get chatty, splurge on days when donations are usually made, how often their biggest donators stop by, tell you way early when specials are on their way, occasionally give you a few dollars off if you're hesitant on a purchase, and even write your number down when you're looking for something specific! Do you need any more reasons??

2. Spending less time driving around, and more time shopping at once store will allow you to thoroughly search the racks for an amazing item. Usually the best stuff gets buried, so take your time, and if you know which shops have the hidden treasures-why bother going elsewhere? Not to mention, the less driving, the less money on gas you're wasting!

3. Spending a whole day thrifting sounds like a fun day, but its tiring and sometimes you end up buying things you don't really need or want, simply because of the thrill. Part of that thrill is walking into a store with no expectations and finding a fabulous deal-and when you only have 1 or 2 items, you feel more guilt about leaving the fabulous find behind. Which means that every time you walk into a new store, you have potential to fall victim to this feeling. Narrow down the number of shops you walk into, and it cuts down that potential. Now when you have a pile of goodies at one shop, you're more inclined to narrow it down, rather than splurge because its only a single item.

4. Many people set budgets, say $20 per store. If you are hitting up 10-15 shops, you have potential to spend $300! Budgets are a great idea for shopping, but if you stick to 5 or less stores in a day, you'll be sure to spend less than $100. Plus, going back to #3, when you have a pile of items at a shop, you're more likely to put some back before heading to the check out which means you'll be less inclined to over spend.

5. Let's face it, one of the benefits of thrifting in general is saving money. So when you choose your favorite shops, one thing you are sure to take into consideration is pricing. If there is a shop out of your price range, take it off your list- and you'll be sure to never overspend at that shop again!

6. Thrift stores tend to have a focus, such as clothes, or home decor. If you head out to accessorize your living room, choose your favorite shop that focuses on home decor. If you walk into a shop that has clothes, you will almost certainly get distracted by a cute top and buy items you didn't head out to shop for!

How I decide: I shop there a minimum of 3 times within 2-3 months. Go on random days, like a Monday, Thursday and a Saturday. That way you know if they don't have much inventory on Monday, it might the day before they accept donations or the day after a sale. If you go on Thursday and there's no inventory either, it might something to consider. If you go to a thrift store 3-5 times and come out empty handed each time -don't go back! If you find something once, there's potential, but if you find the prices too be too high, the stock to be too dirty, or the shop to be smelly, then don't bother! 

Do you choose favorite thrift stores? What are your guidelines and reasoning?
Photobucket

Tuesday, August 28, 2012

INSPIRATION shells

Unfortunately Summer is well on its way out, as a last ditch effort to bring the beach home with us, I decided to do an INSPIRATION using shells. Another fabulous (and FREE) nature item, that provides beautiful texture and color to anything, and welcomes summer all year round! 
INSPIRATION shells
FRAMES: These frames are so cute, and the perfect way to bring your summer vacation home with you all year! Grab a few of your favorite shells, along with a jar of sand and a shadow box frame or a frame without glass! First super glue your shells in the frame, make sure you are liberal with the glue and wait until they are properly adhered. Then slather on a thick amount of modpodge and pour the sand on, wait for it dry and shake off the excess. Once you have it ready (and no more sand falls off) hang on the wall, or sit up on a desk and remember your vacation forever!

FLIP FLIPS: I know, I know, once winter comes flip flops become a thing of the past. But if you wear them around the house, or just want a way to remember your summer vacation (in a functional way), these are perfect! Grab a couple shells, if they have a way to weave twine (or hemp or your favorite string) through, great! If they don't, use a drill bit made for ceramics to drill a small hole! Use the twine to weave or macrome the shells onto your cheap flip flips and whola! Cute, functional, and easy to change out if you feel so inclined!

LAMP: This lamp has so many possibilities! Grab your favorite shape from the thrift store, it can be traditional, or funky, or modern! As long as you like it, it's perfect! Then grab an assortment of shells (or all the same) and use hot glue or super glue to attach. Play with the placement, you can put as many or as little on as you like! When its all finished and dry, you can leave it natural to bring in those great colors, or spray paint your favorite color and leave the texture to speak for itself!

EARRINGS: My favorite accessory, I love earrings, and if I took a vacation to the beach, these would be my preferred way of saving the memento! Choose shells with natural holes, or use a drill bit made for ceramics to create a small one. Then attach a chain to your favorite earring backs (posts or hooks) and use 'O' rings to attach the shells to the chain! Custom, cute and colorful!

Have you tried one of these projects or techniques? I'd love to see it! Send me a link or picture so I can feature it on my blog!
To find out information about the products used, please click the image to head to Polyvore!
•This may be posted to any of the link parties

Photobucket

Friday, August 24, 2012

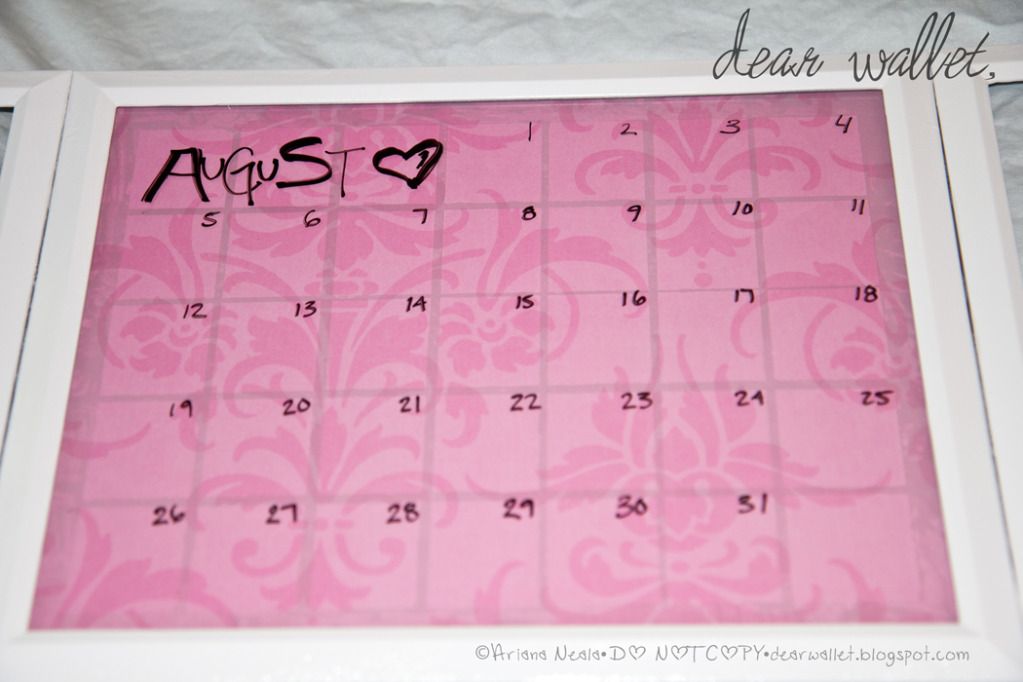
DIY PROJECT: Memo Board Part One: The Calendar

The long awaited DIY project -better be good right? Well here was my dilemma. I originally thought up this idea in response the the Dollar Store Craft Challenge (on the 1st of this month…). I needed something to organize all of my thoughts and office stuff so it seemed like the perfect opportunity. The problem was I was unsure how I wanted to do it-so I kept going back and forth, even after I purchased the supplies. Then something came up so I couldn't post it in time for the challenge anyway. Then I was lazy and a 3 hour project suddenly became a 3 week project. Finally my last issue was, I wasn't sure how to post it because ultimately I was doing 3 projects, and it may be long for one post. Long story short, I've finally decided to break it up over 3 posts. 
 Part 1: The Calendar 
I needed a calendar desperately. Something big and easy to see that I didn't need to flip through pages in a book or a binder. So I could keep track of the generic things, like concerts and doctor appointments! This seemed like a no-brainer to me. 
Supplies: 
Frame-if you have one at home, use it! Mine was from the Dollar Store
  Spray Paint-I had extra on hand in white
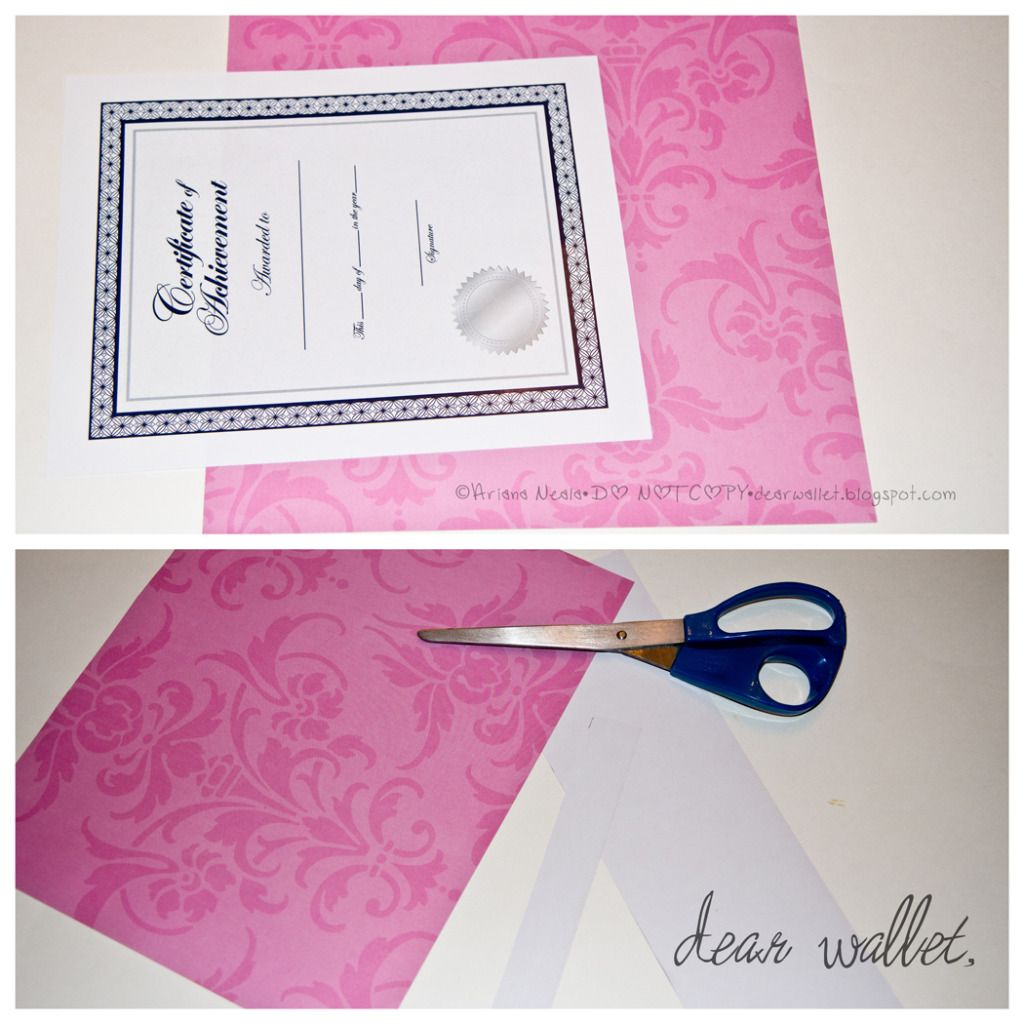
  Scrapbook Paper-I had this on hand, but any paper, or wrapping paper you like will work
  Paint brush-a foam brush will work even better, you can get these at the Dollar Store
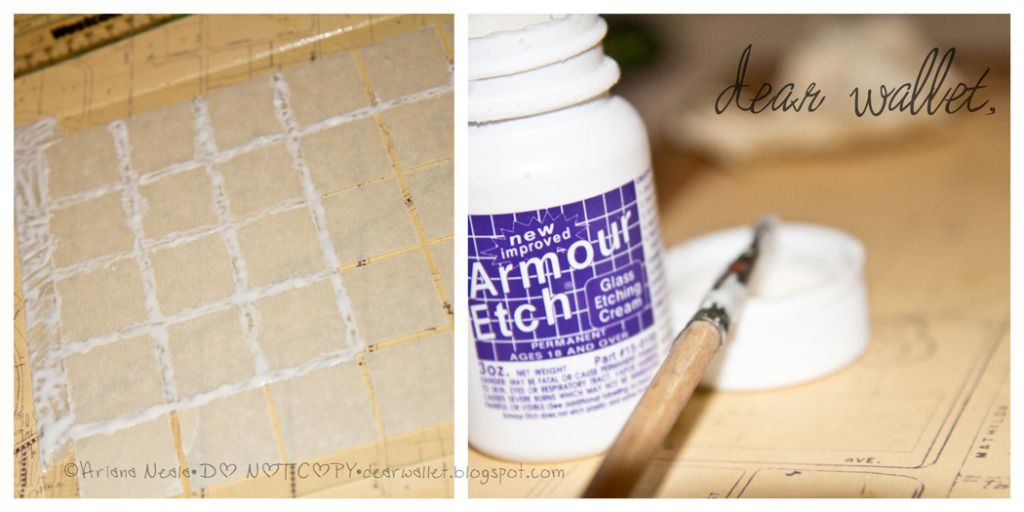
  Etching Solution-had this on hand as well.
 My cost: $1 

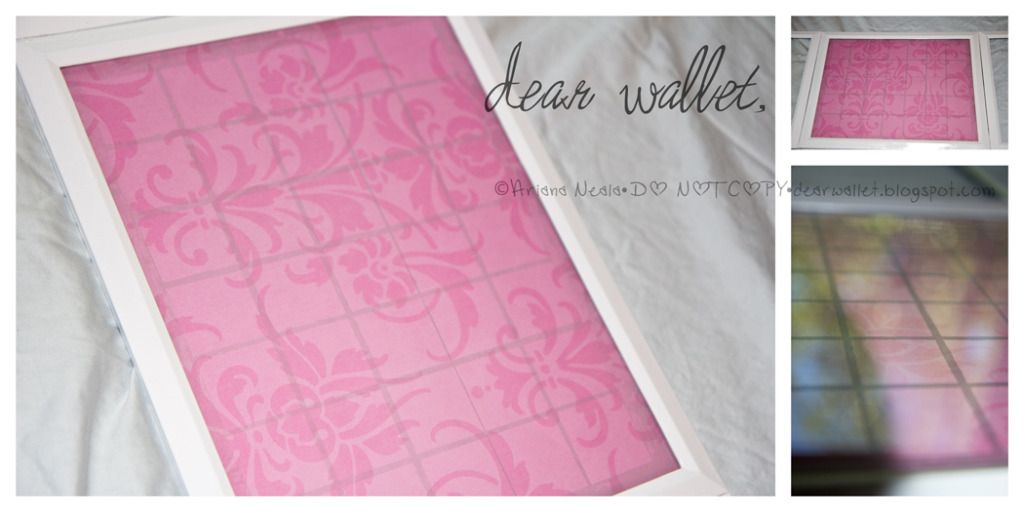
I started this project out by painting the frame, I used spray paint and it ended up using 3 coats-which I will explain later in my third post. I used the paper inside the frame to measure and cut my scrapbook paper to the size needed. Since my office is gray, pink and yellow-I chose a cute pink pattern, the pattern you use should not be bold or distracting, try subdued patterns (tone on tone) or plain colors. 
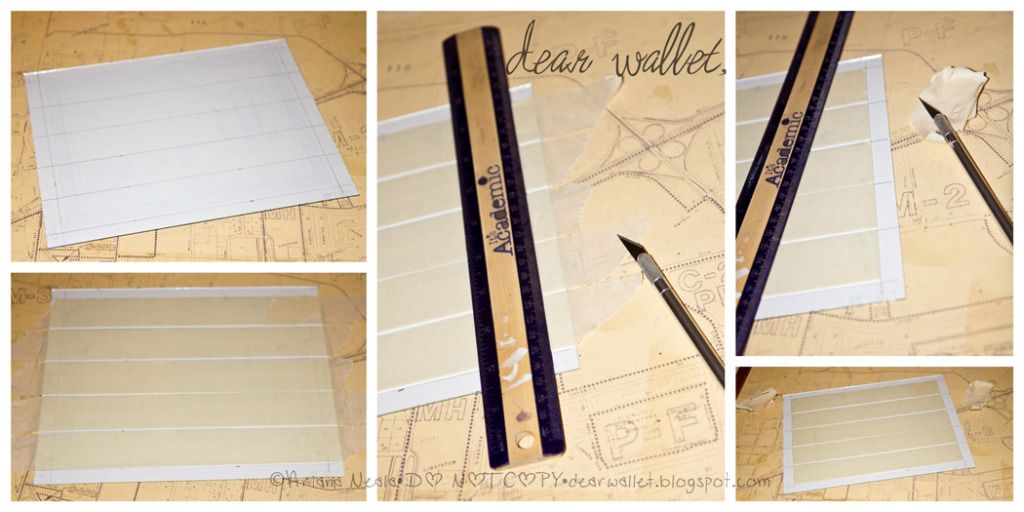
 Next I measured out lines on the back of the page from the frame to create the basis of the calendar on. I measured in half an inch from either side to create a border, then measured what was left and divided by 5 (for horizontal). Then I taped it to the back of the glass. Using masking tape (or whatever you have on hand) I placed the tape along the lines on the other side of the glass, leaving about an 1/8th of an inch between them. Using a ruler and exacto knife, I cut off the excess to create that border. 
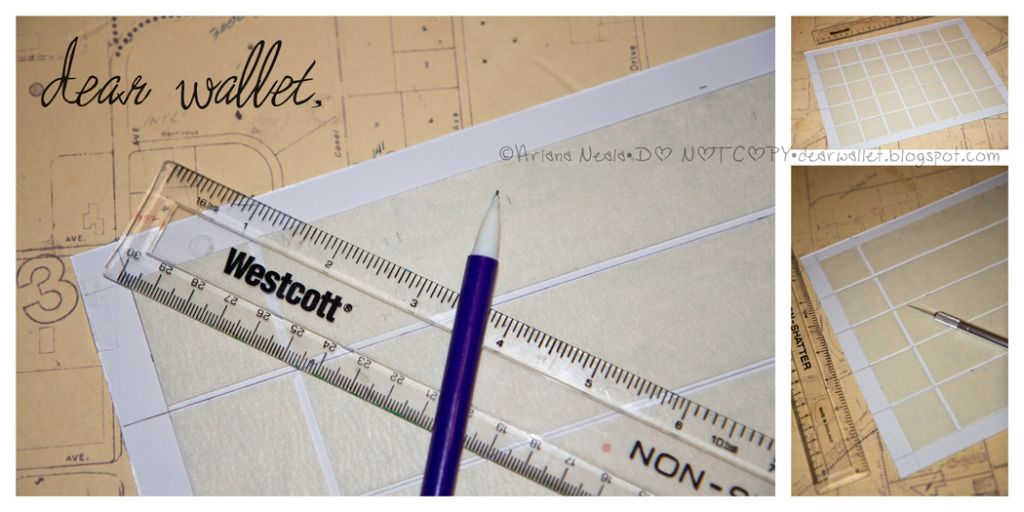
 Measuring again I made the same divisions going down, dividing by 7 (for vertical). I left about 1/8th of an inch again between the boxes, and use the ruler and exacto to cut evenly. 
 Once my calendar was created via tape, I opened the etch solution and began dabbing it on. A foam brush would have worked better to create even strokes and fill it faster. Make sure you apply quickly and liberally. As you can see I did not and mine wasn't as even in the end result. Wait about 5-10 minutes before washing off. 

 After it's dry replace in the frame, placing the paper behind it as a backdrop. You will have a perfect calendar border with a cute interchangeable background!
Now you can write on it with white board pens, and erase when you're done to change the dates every month! Plus, you can purchase the markers at the dollar Store!
Stay tuned next week, for the next part of my office organization!  
•This may be shared on any of the link parties page•

Photobucket

Thursday, August 23, 2012

Christmas Price Check FREE Printable

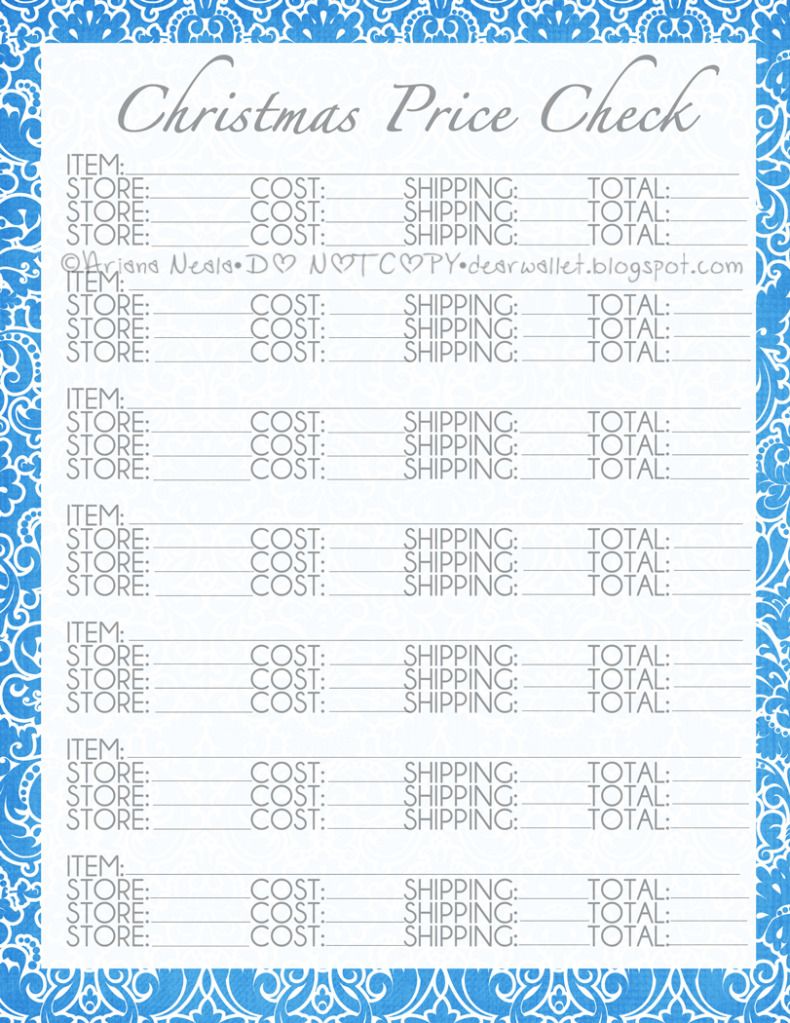
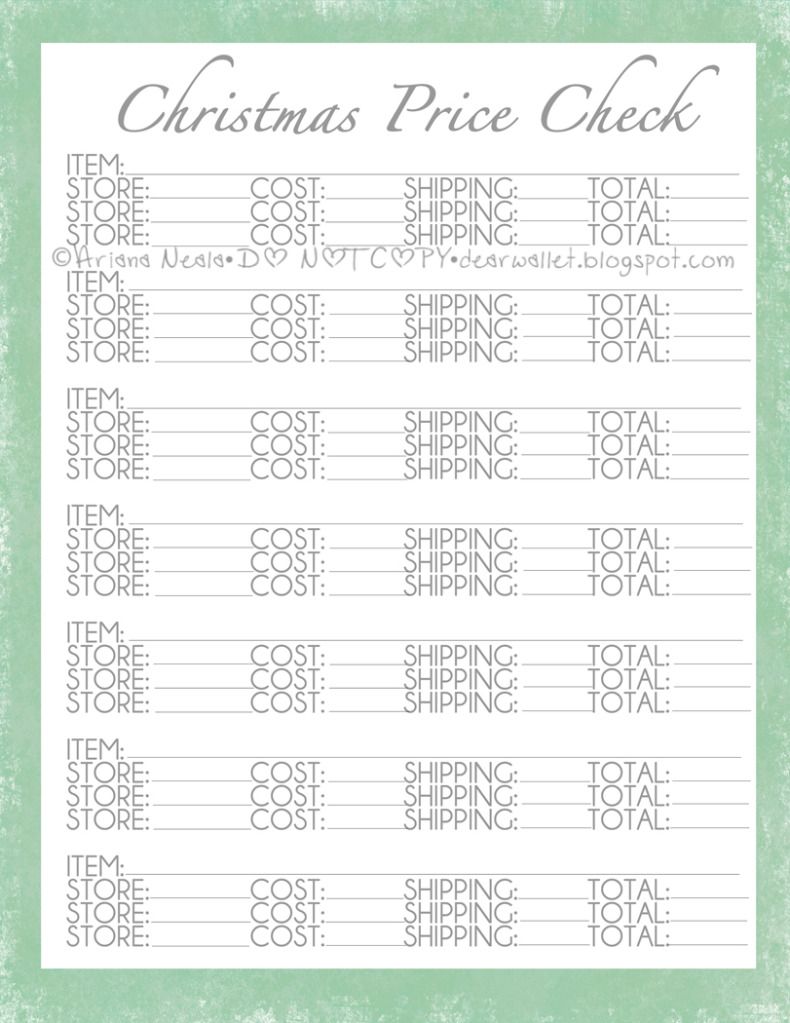
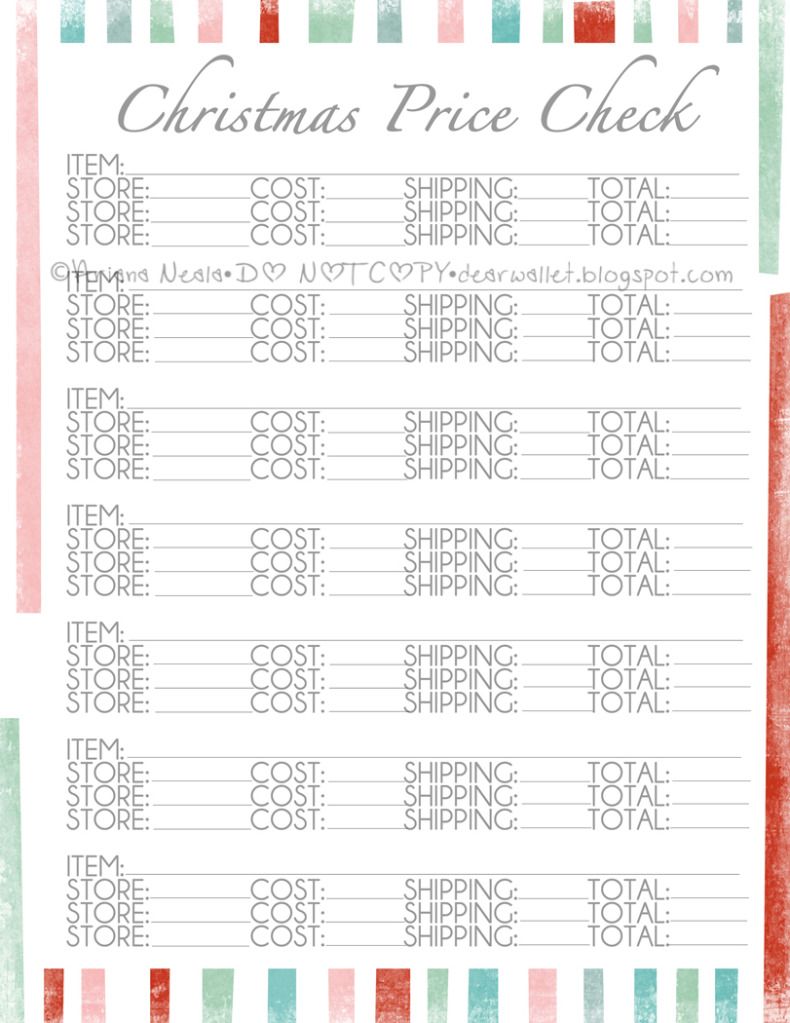
 Told you more Christmas Goodies were coming, and here's the next edition! Possibly my favorite-probably because I love lists AND saving money, so this is a double winner in my book! Once upon a time I was shopping online for a very expensive item, I found a place offering it a LOT cheaper than others, but the shipping was twice the amount as the other places. Thus I created this very sheet to help me tally the prices and therefore save money! I've turned it into a festive, but not too festive worksheet so you guys can keep track of your Christmas shopping prices, allowing you to shop around when you have time, and ensure you get the best price you can!


TIP: Make sure you look around for coupons every chance you get to help you save even more money! 

The worksheet is easy (and free as always!), once you've decided on a gift for someone simply fill it in the item spot. Then find 2-3 stores offering it, record the cost + shipping cost, and total it up. Once you've price checked around a few times (and looked for coupons to lower them even more)! Then choose the best spot for you to purchase from! Keep in mind shipping times as well. For example Amazon offers free shipping on certain items, but it takes a month to receive it. If you have an event you need the item for coming up, make sure you choose the shipping options that works best for you!  

Rules for the download: please, please, PLEASE make sure you subscribe to the blog by GFC, RSS, or bloglovin and share on Facebook or Pinterest to send your friends-Dear Wallet Printables are for followers only! Do not reproduce, or claim as your own, all rights belong to Silver Daisies Studios and Ariana Neala. Thanks so much, click the image to begin download! 
*//EDIT: I truly love that so many of you are loving these printables enough to download, but please take an extra second or two to follow! Thank you! =)

Blue Christmas
 

Jingle Bells
 
Sleigh Rides


•This may be shared on any of the link parties page•
**Background is freebie from Design House Digital**
Photobucket

Wednesday, August 22, 2012

Organizing my Vanity | Arm Candy Edition

**Before you guys get too concerned, I do have an article coming this week, I just messed around with the schedule of my posts to try something new! I also have a DIY project coming up-so stay tuned, and hit that follow button on the sidebar to stay up-to-date!**

I'm in the process of updating my vanity, now by vanity I mean my dresser top (obviously! ;)) because I have ZERO room for an actual vanity (someday...). You may remember my fun post for a Ring Display! Well now I will introduce my bangle display!
Here was my dilemma, I love bangles. I have many, and I tend to buy more and more every time I go thrifting (oops)! For a long time I stored them on long neck wine bottles (on top of my dresser). I also stored bouquets for my photography business in them as well. It worked because it kept them out of the way and they were nicely displayed. The problem was if I wanted to wear one near the bottom I would either have to (take out the bouquets) pour them all off, or skip it. I wanted needed something that was easier.
I spent some time on Pinterest, and google, sketching ideas, and finally decided that a bowl would be the easiest and cheapest route. I made plans for the potential bowl I was going to create (yes DIY)-and then I went thrifting. And found a bowl that only dreams are made of. Ok, maybe not. But I do love it, and when I saw it I had to have it!
I've done some research on it, and it is certainly quite common (especially on etsy). Frustratingly, there are varying facts on it-an 80's Canadian designer versus a 60's Italian designer. While I'd love to know who made it, I love it regardless. Plus-who can pass it up for $1.99!
It works perfect for my bangles, which by the way, after I took these pictures I found the other half of my collection. Turns out not only was it time consuming to take them off the wine bottles-but to put them back as well!
So how do you guys like it? What do you use to hold your bracelets?
•This may be posted to Wednesday of the link parties

Photobucket
Related Posts Plugin for WordPress, Blogger...